Let's Start!

About

This is the sacred document of BISS that has the answers to all the “What? Why? How? When?” questions. It is a live document that grows and evolves based on how we spent our days in company.

Handbook

If you have any questions about something related to the company, from something like “How to git?” to “Where are the coffee mugs in the office?”, you can find it here. If the answer that you are looking for is not present, you are obliged to create a section and give us the information on how to find that coffee mug!

This concept was adopted from the GitLab where they try to record everything related to company. However, we extended it by adding things like “Way of working”, “Tooling” or “Process Design” types of concepts in order to create the ultimate document for everything about the BISS. In that manner, this document is aimed to feel both like manual and wiki.

Subsections of Let's Start!

Subsections of General

Subsections of Guidelines

First Day

Welcome to Bosphorus ISS.

If you are asking yourself “What should I do on my First Day ?”, you came to the right place.

First of all, if you are reading this page, you are most probably our new teammate who tries to get used to this amazing environment. Do not forget, BISS Family is also very much excited with your arrival and congratulates you sincerely. We hope that the recruitment process will go smoothly for you too, as it did with the previous candidates.

We have prepared a guideline for our new teammates to catch up with us.

  • Take a cup of coffee and some snacks from kitchen (It is mandatory). You can easily learn how to use the Coffee Machine or get help from somebody to learn what choices it offers.
  • Don’t worry, the guideline doesn’t take much time and it is designed to be clear and easy to follow. If you encounter a problem, do not hesitate to consult with one of your colleagues.
  • All the other stuff and paperwork related to your contract will be delivered to you in a couple of days.

Subsections of Hardware Setup

Notebook Setup

There are two type of installation as listed below.

  • Windows installation
  • FreeDos Installation

Windows installation

  1. Ask for the bootable disk from friends in the office
  2. Plug it in to your computer
  3. Restart your Windows and press F12 button during the boot
  4. Format the computer with this usb-drive

FreeDos Installation

DELL XPS-15 9570 First Use Setup

This guide/document is specific for DELL XPS-15 9570 notebook.

After you get an USB drive with our current system image, please follow the steps.

  1. Power on the notebook using the power button. Wait until DELL logo appears. After logo appeared, press and hold power button to power off the notebook.

  2. Power on the notebook using power button and press F12 repeatedly to go into the boot menu.

  3. Select UEFI: TOSHIBA TransMemory 1.00, Partition 1.

  4. Use command,

    diskpart

    and press enter to start Microsoft DiskPart.

  5. You can see connected disks by using command

    list disk

    Choose the main disk. In this guide It would be disk 0, so use command

    sel disk 0

    and press enter to select the disk.

  6. You can see volumes of the selected disk by using command

    list vol

    Choose the OS volume. In this guide It would be volume 0, so use command

    sel vol 0

    and press enter to select the volume.

  7. Format the disk by using the command.

    format fs=ntfs quick OVERRIDE label=OS
  8. Leave DiskPart by using the command.

    exit
  9. Cloning image to a local drive has two methods as mentioned below.

    a) Apply the cloned image from disk D (where the clone image exists) to disk C (or where you will install the OS to) by using the command.

    dism /apply-image /imagefile:E:\BISS.wim /index:1 /applydir:C:\

    b) Apply the cloned image from a network location to disk C(or where you will install OS to) by using the commands listed below.

    1. Use this command to connect to remote server.
    net use Z: \\the_ip_where_the_wim_server_exist_on\BISS /user:BISS password
    1. Use this command to clone the image to desired location.
    dism /apply-image /iamgefile:Z:\Images\biss.wim /index:1 /applydir:C:\
  10. After process complete, restart the computer with installed software by using the command,

    exit

    and wait until mouse pointer to disappear. Then unplug the USB flash drives.

  11. Your computer needs some driver installations. You can install them from Windows Update. While updating, you will need to restart the Windows at some points to continue installing other updates. For an healthy system setup, installing all provided updates is preferred.

Changing Computer Name

  1. Go to “Control Panel\System and Security\System”
  2. Under the heading “Computer name, domain, and workgroup settings” click “Change settings” on the right. The System Properties window will open with the “Computer Name” tab selected.
  3. Here click the “Change” button next to “To rename this computer or change its domain or workgroup”.
  4. Then fill the “Computer Name” with your name and surname like “NAME-SURNAME”.
  5. Press “OK”.
  6. You have to restart this PC to apply this changes.

Printer Setup

brother LC3719XL

  1. Download official driver.

  2. Start installation and follow those steps

    • Select Language select-language
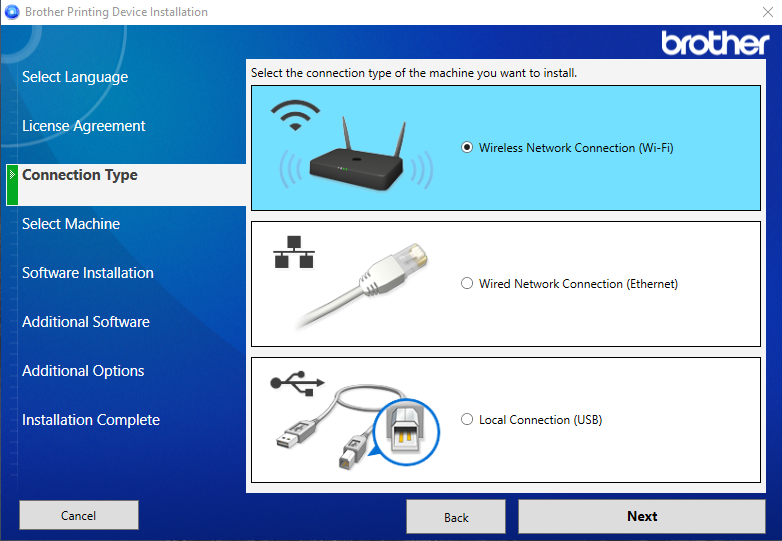
    • Choice Wi-Fi wifi-choice
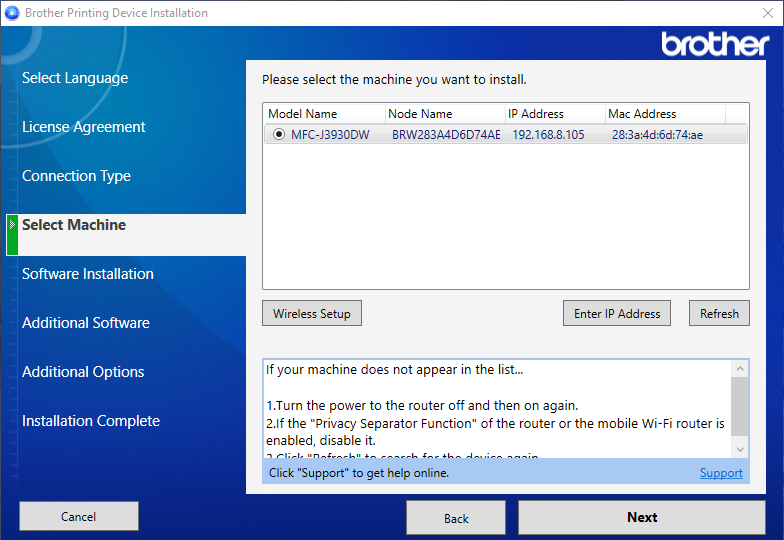
    • It will scan your network and show available printers then you need to select your printer select-machine
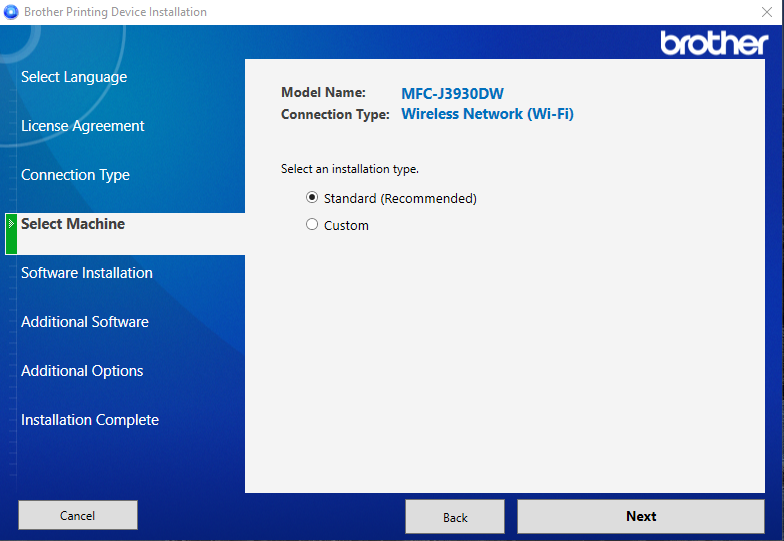
    • Continue with standard configurations select-machine-2
    • Install required packages software-installation
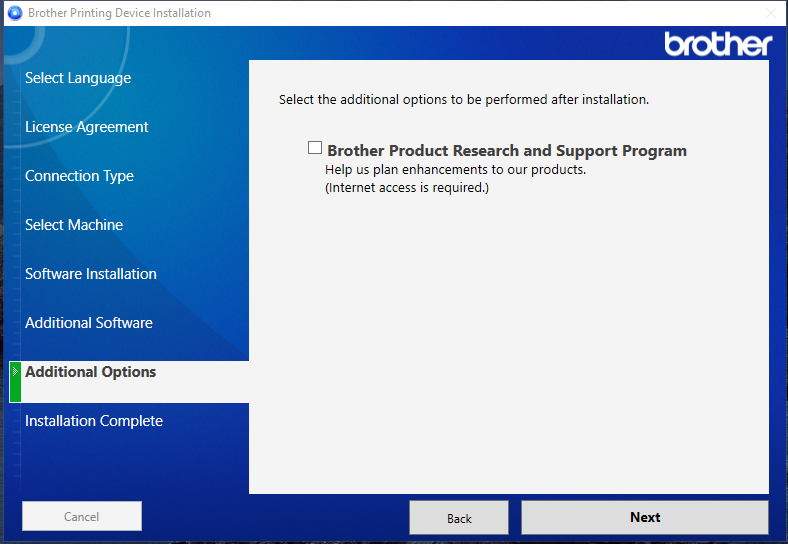
    • Uncheck the support program approval additional-options
  3. Installation finished. You’re ready to use printer over Wi-Fi.

Warming Up

Before we go further, please be sure that following list is completed:

  • You tasted our coffee!
  • You have met at least three people in the office (no, your interviewers does not count).
  • Your PC is ready and succesfully connected to the office wifi.
  • Your bosphorusiss account is ready and you have access to Google workspace.
  • You learned how to lock your laptop your laptop (⊞Win + L) and you lock each time you leave your table.

Voilà! You seem more than ready, now we can start.

Smart Door App

How to acquire Smart Door Application?

  • If you are an IOS user, reach to IT team via it@bosphorusiss.com
  • If you are an Android user download the APK by using Google Shared Drive. Path for directory that contains APKs is: \Shared drives\Bosphorus Industrial Software Solutions\Internal_Projects\Smart_Door_Lock\Android Mobile Apps

smart-lock

Home Office

Home Office

As a company that adopted Home Office right even before the Covid-19 pandemic started, BISS believes in the motto of "Work where you are happy at!".

Requirements for Home Office

  • Completion of the probation period (2 months) for new joiners
  • If your project is suitable for remote working
    • You are not connected to a physical device -don’t worry, BISS VPN saves the day for such situations most of the time-
    • Approval of your project teammates
    • Having a registered and approved home address on BISS ERP (the address where you will make your home office)

If you meet the above requirements, there are no obstacles to creating a home office form.

PS: It is not a requirement, but we recommend that you do not go through a process that requires pair programming. Because pair-programming sessions are much more efficient when they are side by side in the office :)

About the Home Office Form

The home office form is a form where you let your teammates know where you will be working on the next working day. It should only be sent between 06:00 and 15:00 on the working day when you are going to make a home office.

  • A home office form can always be created on the current working day for the next working day.
    • Example: A home office form can be sent for Monday(May 23), between 06:00 and 15:00 on Friday (May 20).
    • Example: A home office form can be sent for Friday, May 20 between 06:00 and 15:00 on Wednesday, May 18 (as Thursday, May 19, is a public holiday)
    • Example: Let’s assume that Monday(July 4), Tuesday(July 5) and Wednesday(July 6) are public holidays, in this case, in order to create a home office form for Thursday(July 7), You need to create the home office form on the previous working day, which is Friday, July 1st between 06:00 to 15:00.
    • Example: To create a home office form for Wednesday (August 3), it is sufficient to create a home office form on Tuesday, August 2, between 06:00 and 15:00. (Assuming August 2-3 is Tuesday and Wednesday and not holidays but PTOs of the employee.)

Creating a Home Office Form

  • You must have a registered/confirmed home address on BISS ERP. (Can be added with My Account/My Addresses/Add)
  • Click the My Home Office Form button on the Home Office page between 06:00 and 15:00 on the working day before the day you work from home, select your approved address to make your home office and click the create button. That is all!

Home Office Rules

  • BISS expects you to be reachable by your team between 10:00 and 16:00, you can use flexible working hours for all remaining hours. In summary, as BISS, we are not interested in what time zone you work outside of core working hours.
  • Do not forget that if you need to leave your registered address for a while during working hours, you must inform your teammates and BISS.

PS: Since you are not in the office, don’t forget to catch up with all the jokes made on the Google Chat channel called Why So Serious? :)

Do not hesitate to contact us for any question!

Programming Resources

You can find all resources about programming such as books, blogs, tutorials and so on:

Subsections of Programming Resources

Books

C++

Linux

Yocto

Subsections of People Operations

Working Remotely

There are two ways to benefit from working remotely:

  • Working in Istanbul (Home Office)
  • Working outside Istanbul

In Istanbul (Home Office)

  • Be reachable during core working hours, 10:00-16:00.

  • Work only at the location, where you declared to be working at (via Home Office Request Form). E.g, it is not allowed to be working @Starbucks due to client data protection

  • Attend to all meetings online, or inform the scrum team, in case you cannot attend.

Outside Istanbul

On top of the rules from working in Istanbul parts, you might want to take a look the bullets below:

  • Talk to the people you work closely (in your projects and teams) and make sure you are on the same page about working somewhere outside Istanbul.

  • Make sure you have all the things you need while working (e.g. computer, client hardware, adapters and etc.)

  • Send the related Working outside Istanbul Request Form

Note

We need to know whether you will be present at Levent Office more than 3 days in a week or not. This is not a final decision you have to make once, just information to help us to arrange office desks.

Health & Work

Some of you might be fighting sickness off, and that’s totally okay! Here’s how to handle it and stay on top of things:

  1. Doctor’s Orders: If you’re feeling unwell, listen to your body! Need time to rest and recover? Do you need to lie down and sleep? Go see the doctor – they’re the experts on getting you back in tip-top shape. Don’t forget to get your report for sickness absence before leaving the doctor’s room!

  2. Work from Home HQ: Feeling a little too under the weather for the office? You are not feeling weakened but you’re worried your symptoms might be contagious? No problem! Work from home and stay comfy. Let your team know you’ll be tackling tasks from your home base, all while wearing cozy clothes and sipping hot tea.

  3. Laughter is the Best Medicine: Feeling gloomy? Share some fun with your team! Send some funny memes, crack a joke or two, and spread some cheer. It can help you feel better and keep everyone’s spirits up.

  4. Stay Hydrated: Drink plenty of water! It’s good for you and can help you feel more energized and focused throughout the day. Keep a water bottle nearby and take regular sips – you got this!

Remember, taking care of yourself is important! Don’t try to be a hero. Rest, relax, and focus on getting better. And don’t hesitate to ask for help from your team – they’re there to support you. ❤

Teams

About Teams

So how does BISS run? Who is responsible of all of these?

Actually WE. You, me and all of us! We are stronger together! We are not waiting things to handle by themselves.
We have teams to handle non-project responsibilities. Everyone has at least one team. Thanks to these teams, all work is done by the whole team.

  • Organization & PR Team
    They are responsible for our happiness and sharing it with the others. If you have an idea that contributes to the happiness of everybody, now you know whom to go! Please add our event calendar to your calendar!

  • Office Network & Cloud Team
    If you come to this point, you have already met with someone from our lovely team(thanks to them again). If you still have some questions to them, please check their gitlab page if it’s in their scope and you can get support easily by opening a task on their board.

  • Training Team
    There is always something new to learn! So we have BISS ACADEMY! Follow their weekly journal for more!

  • Resource Planning Team
    Our whole capacity is managed by them!

  • Process Design Team
    Way of working, git strategies and all other proccesses are designed by them.

  • Technology Team
    Our technical quality and used technologies in our projects are in their hands.

  • Recruitment Team
    You have just become our new teammate, thanks to them!

Of course we are not done! Click for the detailed information: teams.

Travel Rules

Before

  • If it is a client visit, make sure the travel dates are confirmed by the client as soon as possible. This is important not only from the ticket & hotel costs’ perspective, but also for the client contact person to be able to plan his agenda in time.

  • Check the travel dates with your manager as well.

  • Once the dates are confirmed (written confirmation, if possible), book the flight and hotel as soon as possible. Now, this is for cost saving, of course :-)

  • Add Company Calendar to your Calendar and feed your travel information into the Calendar, so that your colleagues can see when and where you will be. This might seem unnecessary but wait until we are 50 people ;-)

  • Claim your Per Diem at least 3 days before traveling. Check out Per Diem. If not claimed within the given time, you travel from your own pocket and get Per Diem after the travel, together with your other expenses. See Employee Expenses

  • Confirm with your mobile operator that you can use your phone abroad as well.

  • Make sure you have the contact information of your local colleagues, other than their names and email addresses ;-).

During

  • Don’t forget that your BISS Team is always with you, no matter what happens, where it happens or whether it is your fault or not. DO CONTACT YOUR MANAGER ASAP, day or night, for any problem you are stuck with. We got you ;-)

  • Collect the bills and invoices for all of your spendings, whether or not it is covered by your Per Diem. For a list of things covered by BISS, check this out.

  • Try to enjoy your time as well; drink some local beer or enjoy a nice cup of cappuccino together with a pice of tiramisu (and tell your friends about it :-))

  • Always keep in mind that you represent:

    • Yourself
    • Your project team
    • Your company, BISS, yey! :-)_
    • Your country, Yes, this may seem odd, but hey, you are in another country with different culture! and think before acting. If you are not sure about anything, ask your teammates and your manager.

After

  • Share some love, and don’t forget to bring something for your colleagues. :-)

  • Enter your expenses into the system. Check out Employee Expenses

  • Give all the hard copies of the invoices/bills to your manager in an envelope, with your name written on it.

Warning

  • Travels not obeying the rules above will be punished by the corresponding baklava rule. Check it out Baklava Rules

Visas

Note

The information(requirements, etc..) here may be old or changed. So please check them with the competent authority to avoid problems.

Germany Business Visa

A Germany Business visa is a short-stay Schengen visa, which permits its holder to enter and remain in Germany up to 90 days within 6 months unless, it is not specified differently in the visa sticker. It is issued to people who come to Germany to perform business making, attend meetings, sign contracts, etc.

Germany Business Visa Requirements

There is a number of requirements not only for German business visa, but for all types of German visas, which you will have to meet one by one, in order to be able to obtain a visa that allows you to enter the country.

The list of required documents for Business visa to Germany are as following:

  • Short-stay visa application form – fully completed with correct and honest information that complies with the information given in the other documents.

  • Identical photographs – 35x45 mm, 2 pieces, no older than six months, and according to the set standards that must be strictly met.

  • Valid national passport

    • no older than 10 years, with a validity of three months beyond your planned stay in Germany and the whole Schengen Zone
    • at least two blank page in order to be able to affix visa sticker, and in accordance with the other passport requirements.
    • copy of page with photo of passport
    • old passports must also be presented
  • Copy of identity card

  • Birth Certificate aka Nufus Kayıt örneği, the whole family should be in sight, must have barcode

  • Travel health insurance – a document that confirms you have obtained health insurance, which will cover costs of at least 30,000 Euros in case of an accident or illness and repatriation in case of death. The insurance must cover the whole Schengen territory and not only Germany. You can get your insurance in IDATA during visa procedures. Check on IDATA website if this is still valid.

  • Service scheme - (aka SGK Hizmet Dökümü)

  • Bank Account Statement - for last 3 months

  • Pricing

    • Visa fee
    • Visa Service fee
  • Send the following information to your project manager:

    Surname:XXX

    Given name: XXX

    Gender: XXX

    Nationality: XXX

    Date of birth: XXX

    Passport no.: XXX

    Passport Expire date: XXX

    and ask your project manager for:

    • Statement of employment - (aka SGK İşe Giriş Bildirgesi)

    • Proof of financial status - Payrools of the past three months

    • Employment contract - if you don’t have “Proof of financial status”

    • Invitation letter - from the business partner, includes:

      • Client name and address
      • Employee’s name, BosphorusISS full name, and employee’s title
      • The dates and purpose of the trip, and if your expenses are being covered by the client or not.
      • Requested visa period, mention if employee enter more than once in Germany in a given period.
    • Company covering letter

      • with entire travel plan (itinerary)
      • mentioning your position, duration of your service,
      • the dates and purpose of the trip
      • if your expenses are being covered by the employer or not.
      • mention if employee enter more than once in Germany in a given period
    • Visa Request Letter Example of visa request letter: https://docs.google.com/document/d/16qUZpE8rotr7cYQI2o4m574QvasJH1er_Bfi3fEHNuU/edit?usp=sharing

    • Flight itinerary – which include flight reservation, rail tickets or other means of transport which you are planning to use to reach Germany. Send manager assistant an email with departure dates and city; they are going to send you the flight ticket. Refer to the following requirements and send all the required information in one email.

    • Proof of accommodation - for your entire stay in the Schengen area – which could be a hotel booking (with details including the address, phone number and email of the hotel)

      • hotel booking details
        • go to booking.com website
        • find a hotel with free cancellation and no prepayment (be careful about last cancellation day of reservation, otherwise we have to pay for it)
        • specify a hotel, check needed information.
        • send manager assistant an email with all required information. They will book the hotel with company’s virtual card and send it to you (also see the following requirement before sending the e-mail).
        • do not forget to cancel your reservation after receiving your visa. You can cancel your reservation via email coming from Booking.com.
    • Certificate of incorporation of the company aka Ticari Sicil Kaydı, Vergi Levhası, İmza Sirküleri. Send an email to manager assistant, asking for these documents.

Per Diem

  • To get per diem before trip, fill and sign this template and hand it over to your manager.
Chapter 3

Way of Working

The workflow that we are following has been evolved to this form based on our earlier experiences with clients and our own internal projects. The individual project workflows may differ based on circumstances like client requirements, however the workflow that is explained here is the lightest form of how we do our jobs. Agility and Fail Fast are the key concepts that we try to achieve with every project.

Subsections of Way of Working

Testing

The test strategy and policy of the company can be seen below with the test glossary. Test policy shows a high-level test approach. The test strategy contains more details about the subjects mentioned in the test policy. Both of them are applied in all projects among the company. Apart from them, explanations of terms and expansions of abbreviations in those documents can be found in the test glossary. Those documents show what we understand from Software Testing and how we apply it in BISS.

Subsections of Testing

Test Strategy

Scope

This document covers the testing and approval steps of the development activities including new features and bug-fixes.

Purpose

  • To determine if the software meets the requirements
  • To explain the software testing and acceptance processes, methods, and responsibilities

Software testing is an activity to investigate software under test in order to provide quality-related information to stakeholders. QA (quality assurance) is the implementation of policies and procedures intended to prevent defects from reaching customers. The test team applies testing and QA activities.

Responsibility & Authority

Client or Business Unit

  • Makes demands by opening issues when required.
  • Reviews and approves of the applications and processes developed.

Development Team & Project Manager

Carries out the application and process development of issues opened by business units or client.

Test Team

  • Manages the test process and to ensure test activity in the company.
  • Follows new technologies and methods and to evaluate their applicability.
  • Evaluates the participation of manual tests in automation and performing maintenance activities of the automation tests.

Test Approach

QA process includes the following test activities;

  • Story/Requirement Review and Analysis: User stories or requirements which are defined by the customer or product owner should be tested (static test) by the test team. Logical mistakes, gaps should be reported.

    • Test Object: Requirements or Stories
    • Test Deliverables: Analyse report
  • Unit Testing: Usually performed by the development team unless there is a certain necessity for the test team. The purpose is to validate that each unit of the software code performs as expected.

    • Test Object: The code
    • Test Deliverables: Defects
  • Exploratory Testing: It is a testing activity where test cases are not created in advance but testers check the system on the fly.

    • Test Object: The application
    • Test Deliverables: Defects, Test Report
  • Feature Validation Tests: Testing the implementation of the user story, requirement or etc.

    • Test Object: Part of the application
    • Test Deliverables: Defects
  • Smoke Testing: It is preliminary testing to reveal simple failures severe enough to reject a prospective software release.

    • Test Object: The application
    • Test Deliverables: Defects, Test Report

  • Performance, Load, Stress, Accessibility Tests: Non-functional tests

    • Test Object: The application
    • Test Deliverables: Defects, Test Report

  • Integration Testing, System Testing, E2E Testing: Functional tests

    • Test Object: The application or a part of the application
    • Test Deliverables: Defects, Test Report

  • Change Based Testing: Regression Testing is the process of testing a system (or part of a system) that has already been tested by using a set of predefined test scripts in order to discover new errors as a result of the recent changes. The effects of software errors or regressions (low performance), functional and non-functional improvements, patches made to some areas of the system, and configuration changes can be monitored with regression testing. Retest is also performed after every bug-fix.

    • Test Object: The application
    • Test Deliverables: Defects, Test Report

  • User Acceptance Testing (UAT) UAT should be performed by a random tester at the end of every project to increase quality if the customer or the product owner will not or cannot run it. These tests should be focused on UX. The tester should have the end-user point of view. It should be very brief because the main aim is not to find all bugs. Ideally, UAT should be performed by the customer.

    • Test Object: The application
    • Test Deliverables: Suggestions, defects, test report

Other activities;

  • Bug Triage: It is a process where each bug is prioritized based on its severity, frequency, risk, etc.
  • Bug Root-Cause Analysis: Identifying defects

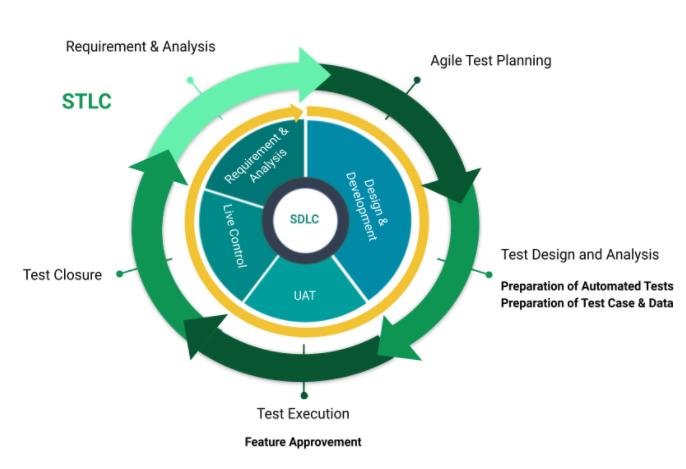
This process is called Software Test Life Cycle (STLC) in international standards. It is carried out in parallel with the Software Development Life Cycle (SDLC) process for BISS.

SDLC & STLC at BISS

The STLC process starts with the submission of the test request and the inclusion of the test team in the project as part of the system analysis studies. This process is continued and completed with Requirements Review, Design & Development, Feature Approvement, and Live Control.

Well-written requirements form the foundation of a successful project. The requirements review is an opportunity to check the requirements document for errors and omissions, and confirm that the overall quality of the requirements is acceptable before the project proceeds. It is also one final opportunity to communicate and confirm project requirements with all stakeholders. The test team carefully reviews all requirements.

Meanwhile, test plan preparation shall be started if requirements are clarified. According to the requirements, technologies to be used, test approach, test strategy, test types to be performed in each test level should be documented. Also, test entry and exit criteria should be defined. This document (test plan) shall not contain technical details which could be changed during the project. It shall be approved by the product owner and be read by all the stakeholders.

In the design and development phase, test scenarios are prepared and the prepared scenarios are reviewed by stakeholders if possible. At the same time, test data is prepared in order to run test scenarios.

Test environment preparation steps are started to be executed after test data is prepared. In this step, the environment in which the prepared test scenarios can be realized and the necessary tools are set up and adjusted. If test scenarios are automated, automatic test scripts shall be prepared in this step.

stlc-sdlc

After test data and the test environment are prepared, functional testing and non-functional testing activities shall be performed.

Automated tests consist of scenarios prepared during the creation of automatic scripts and automated regression scenarios. Manual tests are based on testing the prepared scenarios like the end-user. Both are applied in order to provide optimum efficiency in the STLC process.

The smoke test is also carried out by the Test Team. This type of test is carried out in order to control the main functions of a product after deployment to any environment (test, production, etc.).

UAT tests should be performed by a test team member except project’s testers if it is not performed by the customer or the product owner.

All other non-functional tests like performance, load, stress or accessibility testing could be performed if needed in the project.

Error records are created in the Project Management Tool for detected defects. Resolved defects are tested if the entry criteria that is defined in the test plan is satisfied.

The test report containing the latest status of the project is prepared by the test team manually or automatically and shared with the PO, development team or all stakeholders, periodically. Its content and detail level should be decided by the development team.

Entry & Exit Criteria

Entry Criteria

Entry criteria are the required conditions and standards for work product quality that must be present or met prior to the start of a test phase. Entry criteria include the following:

  • Review of the completed test script(s) for the prior test phase.
  • No open critical defects remaining from the prior test phase.
  • Correct versioning of components moved into the appropriate test environment.
  • Complete understanding of the application flow.
  • The test environment is configured and ready.

Exit Criteria

Exit criteria are the required conditions and standards for work product quality that block the promotion of incomplete or defective work products to the next test phase of the component. Exit criteria include the following:

  • Successful execution of the critical test scripts for the current test phase.
  • Test Cases had been written and reviewed.
  • No open critical defects.
  • Component stability in the appropriate test environment.
  • Product Owner accepts the User Story.
  • Functional Tests passed.
  • Acceptance criteria met.

Test Glossary

Abbreviations

Abrreviation Expansion
STLC Software Test Life Cycle
SDLC Software Development Life Cycle
ISTQB International Software Testing Qualifications Board
IEEE Institute of Electrical and Electronics Engineers

Terms

Term Explanation
Requirements traceability matrix A document that demonstrates the relation between requirements and other artifacts
Static test Tests that are run without executing the code. It consists of manual and automated reviews.
Dynamic test Tests that are run while the application is running.
Functional test Tests that check whether the application is working right.
Non-functional tests Tests that check whether the application is the right product that meets non-functional requirements like performance, usability, and etc.
Change-based testing Testing to verify the latest changes and/or their effects on the whole system.
White-box testing Tests which perform with consideration of internal structure of the software.
Black-box testing Tests which perform with consideration of specifications of the software.
Grey-box testing Tests which perform with consideration of specifications and internal structure of the software.
Regression test Testing an application that has been tested before to be sure that recent changes have not broken anything covered by the regression test suite.
Re-test (Confirmation Test) Testing a part of the application that contains an untested change that has been tested before.
Test data Data that was created during or before test design activities. It could be used by the test or application during test execution or implementation.
Test design A process that test objectives are converted into test deliverables like plans, scenarios, data.
Test execution The process contains running tests and validating actual and expected results.
Test implementation A process that test scenarios are detailed (with steps and test data) and/or automated.
Work product Any output in SDLC (analysis document, code, test scenario, etc.)
Author Work product creator.
Bug/Defect A mismatch that might cause a failure in production between the requirement and software.
Requirement Definition of what customer needs.
User Story Formatted requirements by using everyday or business language to explain what really user needs including non-functional requirements. It also has acceptance criteria.
Acceptance Criteria The criteria that software must satisfy to be accepted by the user.
Test Script Automated or manual scripts to use executing a test.

Test Policy

Mission of Testing

Bosphorus Industrial Software Solutions (BISS) strongly believes that testing saves cost and time, while providing efficiency and quality to all software products. The main idea is to deliver the product in such a quality that the users will have the intended experience.

Definition of Testing

BISS defines Testing as validation and quality improvement of the product from ideation phase to the final delivery within all angles. Testing is an ongoing process together with other processes in SDLC.

Testing Approach

The testing approach is determined according to the project requirements, customer expectations, team knowledge, and project duration. More than one approach might be combined to perform tests in the project.

Test Process

Our process follows the IEEE and ISTQB standards.

This process applies as a general rule for all the projects at BISS. To see the equivalent steps in the STLC or SDLC of each activity please refer to the Test Strategy Document.

1. Requirement Testing

  • Testing requirements, user stories, or analysis documents to see if they are ready for the development phase.
  • Identifying types of testing to be performed. Please check Table 1 for further information.
  • Preparation of the “requirements traceability matrix” (if possible).

2. Test Planning

  • Preparation of test plan and other test documentation.
  • Definition of entry and exit criteria.
  • Selection of test tools.
  • Estimation of the effort (include training time if needed).
  • Determination of roles and responsibilities.

3. Test Case & Test Data Development

  • Creating test cases (automated or/and manual test cases).
  • Creating or requesting test data.

4. Test Environment Setup

This process can be started along with phase 3.

  • Setting up the test environment, users, and data.

5. Test Execution

  • Executing tests.
  • Reporting bugs and errors.
  • Analysing the root cause if possible.

6. Test Closure

Preparation of the test closure document which includes;

  • Time spent.
  • Bug and/or error percentage.
  • Percentage of tests passed.
  • The total numbers of tests.

In each step, there are entry and exit criteria that need to be met. These criteria usually vary from project to project but the common entry and exit criteria can be found in the Test Strategy Document.

7. Test Levels and Test Types

Test Level Owner Test Types Objective(s)
Unit(Component)
  • Developer,
  • Software Tester
  • Functional Testing,
  • White-box testing,
  • Change-related testing:
    • Re-testing,
    • Regression testing
  • Detect defective code in units,
  • Reduce risk of unit failure in production
Integration
  • Developer,
  • Software Tester
  • Functional Testing,
  • White-box testing,
  • Grey-box testing,
  • Change-related testing:
    • Re-testing,
    • Regression testing
  • Defect defects in unit interfaces,
  • Reduce risk of dataflow and workflow failures in production
System Software Tester
  • Functional Testing,
  • White-box testing,
  • Grey-box testing,
  • Black-box testing,
  • Change-related testing:
    • Re-testing,
    • Regression testing
  • Non-functional testing:
    • Performance,
    • Load,
    • Stress,
    • Accessibility
  • Detect defects in use cases,
  • Reduce risk of the system behavior in a particular environment
Acceptance
  • Software Tester,
  • Product Owner,
  • Customer
  • Functional Testing,
  • Black-box testing,
  • Alpha testing,
  • Non-functional testing:
    • Performance,
    • Load,
    • Stress,
    • Accessibility
To be sure the software is able to do required tasks in the real world.

Process Design

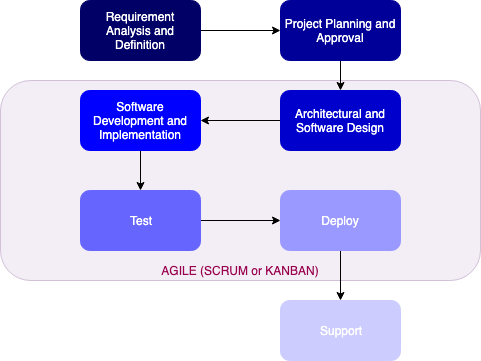
From “Requirement Management” to the actual “Product to be Deployed” the process that we follow as a company can be seen below.

process-design

This process flow also helps us to add any CR (Change request) during development since the teams are already changing their architectural and software design during the implementation phase. The thing that we are trying to achieve is failing fast so that we can adapt to any circumstance, like environment limitations, or CRs.

Subsections of Process Design

Agile Software Development Lifecycle

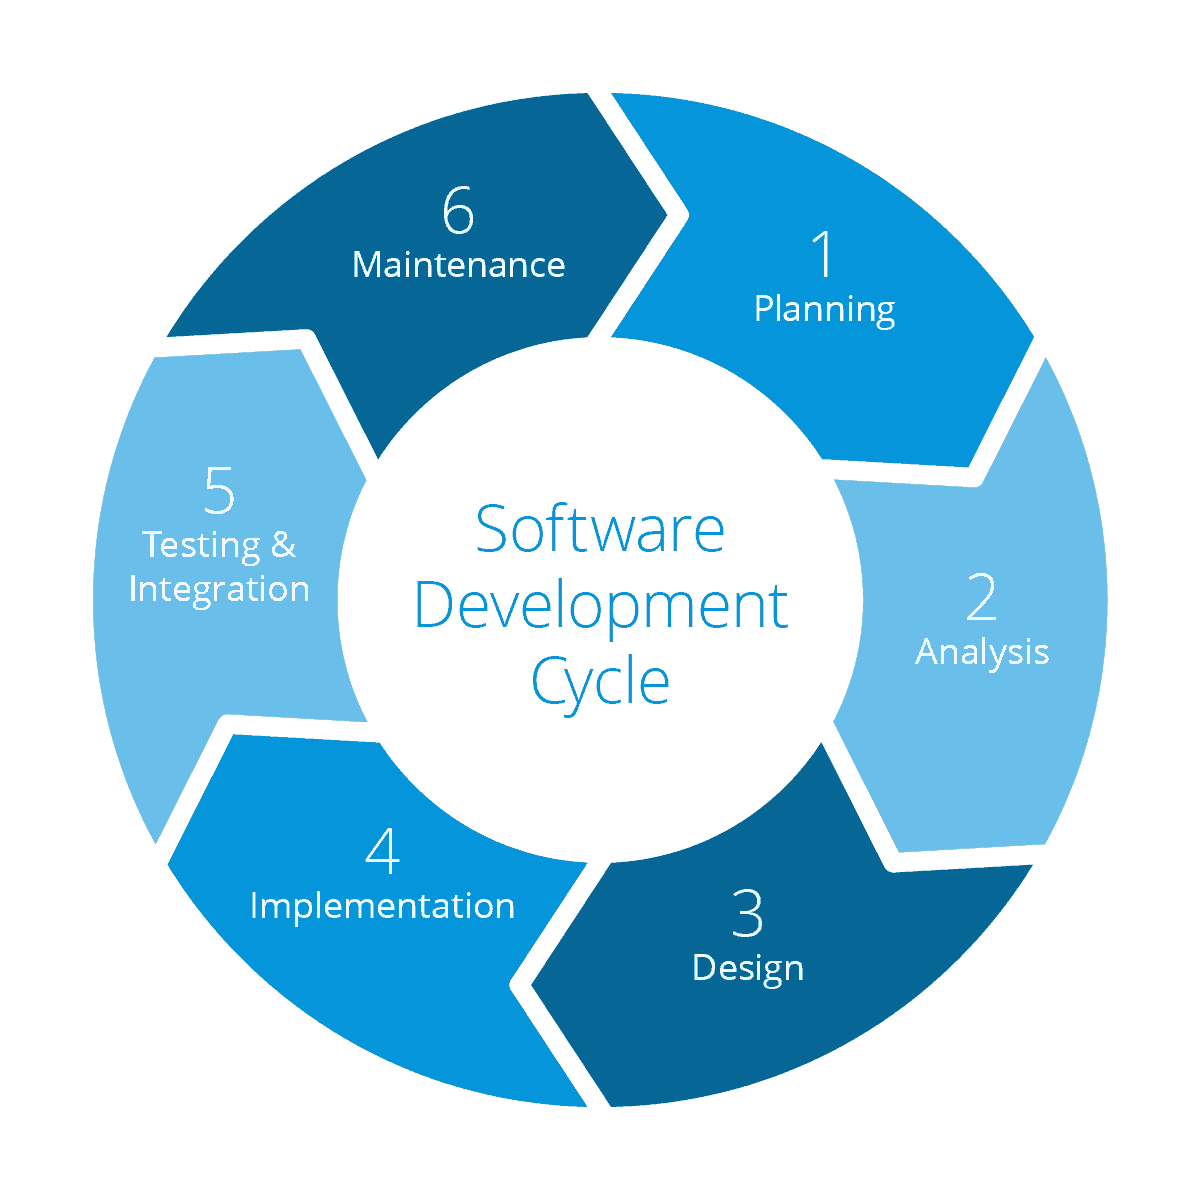
The part that has been marked as the “Agile” is the part that we focus as development team and use the Agile Frameworks (Scrum or Kanban) to track our development. This part can be extended as follows:

software-development-lifecycle

This way of working helps us to work closely with stakeholders and adapt to any request from them immediately.

Process Flow

The process that we follow for each sprint is shown below, this also shapes our scrum board for sprints as well. Each box represents a column on scrum board while to move an issue from one box to another requires the “Quality Gateway” between those boxes to be met.

process-flow

Stages

Each stage here represent a column on a team’s scrum board. These can differ based on client or team needs. It can also change based on the project type itself, yet, this creates a good basis in order to follow a common way of working.

  • Backlog: The issues are not required to be groomed here. They can represent a huge deliverable or a small bug at this point. Issues might be prioritized or not. Grooming and planning meetings are done in order to refine these issues.
  • To Do: These are the issues that teams agreed on finishing within a sprint. These issues have clear goals, prioritization, estimation, well written description and all the other required things from the team in order to start the development. Issues here should meet “Definition of Ready”
  • In Progress: Here, all the tasks are being developed by a member or members of the team. In development, developer should consider all the things written inside the issue, and should aim to satisfy the acceptance criteria.
  • In Review / QA: This part is where PO or QA tester takes an issue that is marked by a developer as “Development is finished” and tests it against the acceptance criteria and other test cases.
  • Done: If an issue is marked as “Done”, this means that it will be delivered with the next increment and the feature is completed. Issues here should meet “Definition of Done”

Quality Gateways

In order to help each member of the team, we have some “Quality Gateways” that we highly suggests teams to use in order to increase the product quality as well as saving teams time for not going back and forth between the stages.

  • Quality Gateway 1: The first “Quality Gateway” is there in order to help developers understand everything about the issue. There are things to be taken into consideration before taking any issue to the next sprint, and they represent this QG.

    • Issue should be well groomed with clear acceptance criteria and story (if applicable, it can be a bug or technical debt issue, thus, it might not have story)
    • Estimation should have been done by the team.
    • Priority should be set.
    • Should satisfy “Definition of Ready”
    • Impact analysis should be done.
  • Quality Gateway 2: This gateway is really similar to the QG1 where all the things that were mentioned there should be reconsidered. Other than those we recommend:

    • Tasks should have been created by the team. (if applicable)
    • Issue picked up by a developer
  • Quality Gateway 3: This part is supported with the CI pipelines for achieving the quality, yet, it still needs some investigation by the team itself.

    • Unit tests are executed and they pass (if applicable)
    • Merge request is submitted.
    • Automated build succeeds.
    • Code review is done.
    • Static code analysis is done. (if applicable)
  • Quality Gateway 4: This gateway decides if the feature should be in the next increment. Here PO and QA testers checks the issues and sees if it satisfies the requirements.

    • Acceptance criteria is checked.
    • QA tests are executed and they pass.

Waterfall vs Agile

Unless there is strict request from client, we highly encourage our teams to use “Agile” as their software development process. However, there can be projects where all the things are already planned, all the deliverables are time boxed and decided beforehand and when there is a priority on delivering a finished product instead of failing fast, instead of calling our methodologies “Scrum, but…” we can decide on working with different processes for software development.

Scrum

To achieve the agility in our projects, we leverage the Scrum framework. The best traits that we see in scrum are being lightweight and simple to understand. It is true that Scrum is hard to master, however, since we adopted it from the day we started the company, we are highly motivated about using it to our benefit. Please spend a bit of time to go over the Scrum Guide for more detailed information on Scrum.

Scrum Values

  • Courage: People are encouraged to speak their minds both on projects that they participate as well as at town hall meetings. We focus on empowering individuals to make their own decisions in order to be more successful on delivering high quality product.
  • Focus: Everyone within the company focuses on meeting the goals of the Sprint and Scrum team. This would be on both delivering the high value as well as meeting the standards of team and company.
  • Commitment: People within the company are committed to achieve both company and scrum team goals.
  • Respect: People are independent and it is being respected by everyone within the team.
  • Openness: The scrum team agrees to be open to each other in order to create an environment for self development as well as for a better product.

Scrum Events and Artifacts

  • Sprint : Every project team works on their time framed sprints. Timebox might differ from team to team, however, it must be boxed.
  • Sprint Planning : Each team has their own planning meetings with Product Owners, Scrum Masters and Development Teams. This will be the agreement meeting on what will be achieved in the next sprint.
  • Daily Scrum : Each team would have their scheduled meetings everyday for updating their team members on what has been done the previous day and what is the plan for the current day. Attendance to Daily Scrum is crucial and the punishment for not attending the meeting more than twice within a month is decided by the team. (Baklava is highly encouraged.)
  • Sprint Review : Held at the end of every sprint to show the increment to the PO as well as the stakeholders. Each time are required to have this meeting.
  • Sprint Retrospective : This meeting is regarded as the low priority by most people using Scrum, yet, this is one of the most prioritized events that we want teams to be held. This meeting helps teams to grow and understand their weaknesses as well as their strengths.
  • Backlog Refinement(Grooming) : This meeting is recommended yet, not mandatory. The owner and some, or all, of the rest of the team review items on the backlog to ensure the backlog contains the appropriate items, that they are prioritized, and that the items at the top of the backlog are ready for delivery.

This event ends up producing the artifacts that can be seen below:

  • Product Backlog
  • Sprint Backlog
  • Increment

Transparency

There are two concepts that we apply in scrum in order to achieve transparency during the scrum and within artifacts.

  1. Definition of Ready

  2. Definition of Done

Acceptance Criteria can be used to leverage those two concepts.

How to Scrum?

At this point it is should be clear that all the things mentioned above are the things that we require from our project teams to apply to their projects. However, the time limits, number of project members are based on different requirements such as:

  • Team structures
  • Team size
  • Clients needs
  • Project complexity

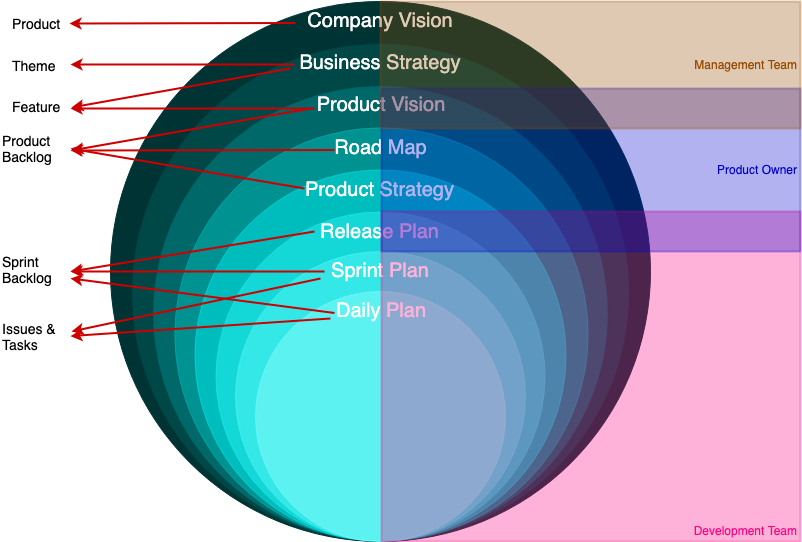
Scrum Methodology Requirement Levels

requirement-levels

The requirement levels diagram below summarizes what are the responsibilities for each entity as well as where the requirements fall under scrum.

Subsections of Scrum

Sprint Planning

Frequency: Once per sprint

Meeting length: 2 - 8 hours

What is Agile Planning?

Agile planning is focused on getting the answers to simple questions like

  • What is to be built?
  • When will it be completed?
  • How much will it cost and who should be involved?

The project managers also explore hidden dependencies for various activities to minimize the idle time and optimize delivery period. Agile planning revolves around measuring the velocity and efficiency of an Agile team to assess when it can turn the user stories into processes, production-ready software, and quality product delivery. The ultimate goal of Agile planning is to have a clear picture of project vision, production roadmap with sprint schedule, and business interests. To simplify the things, Agile planning can be stipulated of different levels;

  • product vision
  • product roadmap
  • release
  • iteration
  • daily commitment.

Level 1: Agile Planning For Product Vision – Five Tips

Agile planning starts with product vision creation ensuring that strategies are aligned properly and the development team spends its time on creating the right valuable product. The product vision guides the team members for the shared goal like a lighthouse. The product vision statement tells about ‘how the product supports organization’s strategies.’ You can simplify the process of Agile product vision development by making it a four-step exercise – development, drafting, validation, finalizing. The following five tips will help you to get the most out of it:

  • Product vision should deliver the unique feel of ownership to keep you motivated.
  • Validate your product vision with all the stakeholders, Scrum team members, users etc.
  • Develop the product vision iteratively & incrementally with the scope to make it better over time.
  • The product vision pitch should address all the key concerns of different stakeholder groups pertaining to quality, product goals, competition, longevity and maintenance needs etc.
  • Focus your product vision on the values for users and customers not merely on the most advanced technology.

Level 2: Agile Product Roadmap Planning– Five Tips

An Agile product roadmap is a plan that describes the way the product is likely to grow; it also facilitates for learning to change. To succeed in Agile management, you need to have a goal-oriented roadmap as it provides crucial information about everyday work by the team. As a powerful Agile management tool, it helps to align all the stakeholders and to estimate sufficient budget for quality product development as per schedule. Creating effective roadmap is often a challenge because changes occur unexpectedly in an Agile environment; however, the following five tips will help you plan the most effective roadmap:

  • Do all the necessary prep work including describing & validating the product strategy. To know more about ‘Product strategy in the Agile world’, visit - https://svpg.com/product-strategy-in-an-agile-world/ .
  • Focus your product roadmap on goals, benefits, objectives, acquiring customers, removing technical debt and increasing engagement etc.
  • Let your product roadmap tell a coherent story about the likely development of a product. To simplify the task, you can divide the product roadmap into two parts- internal product roadmap and external roadmap. The internal product roadmap is focused on development, service, supporting groups, marketing, sales etc; while, the external roadmap is focused on prospective & existing customers.
  • Keep the product roadmap simple and realistic to make the features understood by everyone concerned.
  • Make your product roadmap measurable; so, think twice before adding timelines and deadlines.

Level 3: Release Planning – Five Tips

In Agile landscape, the release is a set of product increments released to the customer. The release plan defines how much work your team will deliver by the mentioned deadline. Release planning is the collaborative task involving Scrum master (facilitates the meeting), Product owner (shares product backlog view), Agile team (provides insights into technical dependencies & feasibility) and Stakeholders (the trusted advisors). The following five tips will help you in effective release planning:

  • Focus on goals, benefits, and results.
  • Take dependencies and uncertainties into account.
  • Release early but don’t release just for the sake of scheduled releasing.
  • Only release the work that is ‘Done’. To know more about ‘Definition of Done (DoD)’ in Agile, plz visit - https://www.knowledgehut.com/blog/agile-management/definition-of-done-use-in-agile-project .
  • Each release process has the scope for betterment. Continuous release process improvement helps you deliver more values for the product.

Level 4: Iteration Planning - Five Tips

The iteration planning is done by holding a meeting, where all the team members determine the volume of backlog items they can commit to deliver during the next iteration. The commitment is made according to the team’s velocity and iteration schedule. The following five tips will help you in effective iteration planning:

  • Span the iteration planning meeting maximum up to 4 hours.
  • The planning meeting is organized by the team and for the team; so, everyone should participate.
  • Avoid committing anything that exceeds the historical team’s velocity.
  • Keep time for ‘retrospectives’ in the past sprints before planning for the next one. To know more about ‘Agile retrospective’, visit - https://www.agilealliance.org/glossary/heartbeatretro/.
    Follow the four principles prepare, listen, respect & collaborate

Level 5: Daily Commitment Planning– Five Tips:

Like many other planning activities for Agile management, the daily commitment planning also needs the synchronized partnership of teams. The daily planning meeting is focused on completing the top-priority features. The 15-minute standup meeting facilitates face-to-face communication on individual’s progress and impediments if any. The following five tips will help you in progress-oriented daily commitment planning:

  • Keep it around the task board.
  • Start on time regardless of who is present or not.
  • Let each team member go through the questions like - what he did yesterday, what is his plan for today, and, is there any impediment?.
  • Use ‘Parking Lot’ for the unresolved issues. The purpose of daily Agile-Scrum planning is to let the team members know about ‘being done’, ‘needs to be done’ and ‘hindrance if any’. Anything out of this scope should be listed in ‘Parking Lot’ to be dealt later.
  • Do preparation ahead of time. The team members should know ‘what they need to share’.

Daily Scrum Meeting

Frequency: Daily

Meeting length: 10 - 15 minutes

Scrum meetings are a part of agile meetings, or scrum ceremonies, where all team members can sync up on the work they did in the last 24 hours, and go over what’s on deck for the next 24 hours.

Daily Scrum Meeting Checklist

Blockers

Is there anything preventing contributors from getting work done? Things to bring up here might be technical limitations, departmental and team dependencies, and personal limitations (like vacations booked, people out sick, etc.).

What did you do yesterday?

This is a quick rundown of what got done yesterday (and if anything didn’t get done, then why). This isn’t the time for each person to run down their whole to-do list – they should focus on the large chunks of work that made up their deep focus time, and the activities that are relevant to your team as a whole.

What are your goals for today?

Here, each team member will say what they want to accomplish – in other words, what they can be held accountable for in tomorrow’s daily scrum meeting.

How close are we to hitting our sprint goals? What’s your comfort level?

This agenda item will help the scrum master get an idea of how the team is feeling about how their day-to-day activities are impacting overall goals for the team, and how contributors are feeling about the pace of the sprint.

What to avoid in your daily scrum?

Lateness

Being late for any meeting is disruptive, but it’s particularly distracting when the meetings are only 10 minutes long. Hold your team accountable for being on time, every time.

Monopolizing the conversation

Giving each team member the opportunity to talk is hugely important. Reinforce this at the start of each scrum if you find that certain team members have a tendency to ramble on.

Over-formalizing the process

Don’t over-complicate your scrum meetings. Keep the agenda the same each time you meet, and make the technology for meeting consistent. Daily scrum meetings involve less than 10 minutes of meeting prep, max.

Other daily scrum meeting tips:

  • Hold your daily scrums in the morning and at the same time each day
  • Do you daily stand-ups in person (standing up) where possible. If that’s not possible, use a reliable and consistent tool for communicating remotely (we love a good Slack Bot for this).
  • Let the team lead the conversation
  • Be a time cop and don’t let your stand-ups run more than 10 minutes

Referenced from here.

Sprint Review

Frequency: Once per sprint

Meeting length: 1 - 4 hours

Sprint Review or a Demo?

Many of those practicing Scrum mistakenly call the Sprint Review a Demo. Is it just a matter of terminology? From my point of view, the Sprint Review is the most underestimated Scrum Event, and for many companies, its potential is yet to be revealed. It is true that the Demonstration or Demo is an essential part of the Sprint Review, but it isn’t the only one.

The Sprint Review is much more than just a Demo.

Let’s find out why.

Who attends the Sprint Review

The Scrum Team and stakeholders (users, other teams, managers, investors, sponsors, customers, etc.) One could say that we invite the whole world to the Sprint Review and this is absolutely true.

How the Sprint Review Is Conducted:

  • The Product Owner opens the meeting and tells the attendees what the Development Team completed during the current Sprint (what has been “Done” and “not Done”).
  • The Development Team demonstrates the “Done” functionality (Demo), answers the questions and discusses problems they met on their way.
  • The Product Owner discusses the current state of the Product Backlog, marketplace changes, and forecasts the likely release dates.
  • The attendees collaborate on the Product Backlog Items, which can be completed during the next Sprint. Thus, the stakeholders get a shared understanding of the future work.
  • A review of the budget, timeline, potential capabilities follows.

The Opportunity To Inspect And Adapt.

Sprint is one of the five official Scrum Events and is an opportunity for the Scrum Team to practice empiricism. Here is a short summary of what we inspect and adapt during the Sprint Review.

Inspect: Sprint, Product Backlog, Increment, Marketplace, Budget, Timeline, Capabilities.

Adapt: Product Backlog, Release Plan.

Inspecting Is Much More Than Just An Increment.

The Sprint Review is not just about product demonstration, it is an inspection of the completed Sprint, the Product Backlog and the marketplace. Also, it is a place for reviewing budgets, timeline and capabilities. Each Sprint is an important risk mitigation tool and the Sprint Review is a decision point for the Product Owner.

Each Sprint can be the last one. The Product Owner makes a formal decision regarding financing the next Sprint during the Sprint Review.

Here are some decisions that can be formally made:

  • Stopping/Pausing the development
  • Financing the next Sprint
  • Adding team(s) with an assumption that it will speed up the development
  • Releasing Increment (can be done anytime during the Sprint)

Is My Sprint Review Good Enough?

Scrum is based on iterative and incremental development principles, which means getting feedback and making continuous updates to the Product Backlog. Unfortunately, teams often forget about it.

The Sprint Review is a great tool for getting feedback, while the number of changes to the Product Backlog after the Sprint Review can be an important indicator of how healthy your Scrum is.

Why Many Scrum Teams Don’t Go Beyond Demo

Many teams/companies underutilize the entrepreneurial spirit of Scrum and its concept where the Product Owner is a mini-CEO of the Product. Very often, stakeholders attend only the Increment demonstration (usually done using a projector) with few questions asked and then everybody leaves shortly afterwards. This may happen for several reasons:

  • The Product Owner doesn’t actually “own” the product, cannot optimize the ROI or make strategic decisions about the product, and is, in fact, a Fake Product Owner (FPO). During the Sprint Review, stakeholders (with actual Product Owner among them) often “accept” the Scrum Team’s work.
  • The company’s business and development departments continue to play the “contract game” with predefined scope and completion dates. In this case, the Sprint Review inevitably becomes a status meeting.
  • Superficial Scrum implementation at the company.
  • The Product Owner doesn’t collaborate enough with stakeholders.
  • This is a case of “fake Scrum”, when the Scrum Team handles only a part of the system with inputs and outputs and not the real product. There is nothing to show and nothing to give feedback on.

Good Sprint Review Practices

  • An informal gathering with coffee and cookies that looks more like a meetup, often held as an Expo or a Review Bazaar.
  • The Product Backlog is updated after/during the Sprint Review.
  • The meeting is often attended by the end users.
  • The Development Team communicates directly with end users and stakeholders and gets direct feedback from them.
  • The “Done” product is showcased on workstations where the stakeholders can play with the new functionality.

Signs of An Unhealthy Sprint Review

  • A formal/status meeting.
  • The new functionality is demonstrated only in a slide show.
  • The Product Owner “accepts” the work completed by the Development Team.
  • The Development Team isn’t (fully) present.
  • Neither are stakeholders and/or end users.
  • The demonstrated functionality does not meet the Definition of “Done”.
  • The Product Backlog is not updated. The Scrum Team works with a predefined scope.
  • The stakeholders “accept” the completed work from the Product Owner.

The Bottom Line

Well, I wrote quite a lot. Let’s sum it up.

  • The Sprint Review is more than just a Demo. The Sprint Review is a place to discuss the marketplace changes, examine the completed Sprint as an event, update the release schedule, discuss the Product Backlog and the possible focus for the next Sprint. This is where the dialog between the Scrum Team and the stakeholders takes place and feedback on product Increment is obtained.
  • The number of changes to the Product Backlog can be an important sign of how healthy your Scrum is.

Sprint Retrospective

Frequency: Once or twice per sprint (Not mandatory)

Meeting length: 1 - 4 hours

Sprint Retrospective is an opportunity for the Scrum Team to inspect itself and create a plan for improvements to be enacted during the next Sprint.

The Sprint Retrospective occurs after the Sprint Review and prior to the next Sprint Planning. This is at most a three-hour meeting for one-month Sprints. For shorter Sprints, the event is usually shorter. The Scrum Master ensures that the event takes place and that attendants understand its purpose. This is the opportunity for the Scrum Team to improve and all member should be in attendance.

During the Sprint Retrospective

The team discusses:

  • What went well in the Sprint?
  • What could be improved?
  • What will we commit to improve in the next Sprint?

Expected Output

The Scrum Master encourages the Scrum Team to improve its development process and practices to make it more effective and enjoyable for the next Sprint. During each Sprint Retrospective, the Scrum Team plans ways to increase product quality by improving work processes or adapting the definition of “Done” if appropriate and not in conflict with product or organizational standards.

By the end of the Sprint Retrospective, the Scrum Team should have identified improvements that it will implement in the next Sprint. Implementing these improvements in the next Sprint is the adaptation to the inspection of the Scrum Team itself. Although improvements may be implemented at any time, the Sprint Retrospective provides a formal opportunity to focus on inspection and adaptation.

Backlog Refinement (Grooming)

Frequency: Once or twice per sprint (Not mandatory)

Meeting length: 2 - 4 hours

Backlog refinement (formerly known as backlog grooming) is when the product owner and some, or all, of the rest of the team review items on the backlog to ensure the backlog contains the appropriate items, that they are prioritized, and that the items at the top of the backlog are ready for delivery.

Backlog Refinement Checklist

Prioritization

Items should be discussed and prioritized based on customer / market needs.

Decomposition of Items

The issues should be completed within a sprint, thus, if there are any issues that are not

Cleanup of Deprecated Items

Some of the issues may be deferred due to change of requirements or necessity of that feature, thus, cleanup of the backlog items can be done here.

What to avoid in your grooming?

Planning

This has its’ own meeting, attendees should not discuss the sprints that these items will be developed.

Old Issues - Completed Sprints

This meeting is to clean the backlog, completed items are not in scope of this meetings.

Performance and Forecasting

These can be done during retrospective, this has nothing to do with the grooming meetings.

Other grooming tips:

  • PO can discuss priorities and requirements with stakeholders before the meeting.
  • Weight (or any other measurement types) can be added during this meeting.
  • Not everyone is needed in this meeting.

Referenced from here and here

Sprint

Frequency: Daily

Duration: 1 - 4 weeks

The heart of Scrum is a Sprint, a time-box of one month or less during which a “Done”, useable, and potentially releasable product Increment is created. Sprints have consistent durations throughout a development effort. A new Sprint starts immediately after the conclusion of the previous Sprint.

Sprints contain and consist of the Sprint Planning, Daily Scrums, the development work, the Sprint Review, and the Sprint Retrospective.

During the Sprint:

No changes are made that would endanger the Sprint Goal; Quality goals do not decrease; and, Scope may be clarified and re-negotiated between the Product Owner and Development Team as more is learned. Each Sprint may be considered a project with no more than a one-month horizon. Like projects, Sprints are used to accomplish something. Each Sprint has a goal of what is to be built, a design and flexible plan that will guide building it, the work, and the resultant product increment.

Sprints are limited to one calendar month. When a Sprint’s horizon is too long the definition of what is being built may change, complexity may rise, and risk may increase. Sprints enable predictability by ensuring inspection and adaptation of progress toward a Sprint Goal at least every calendar month. Sprints also limit risk to one calendar month of cost.

Cancelling a Sprint

A Sprint can be cancelled before the Sprint time-box is over. Only the Product Owner has the authority to cancel the Sprint, although he or she may do so under influence from the stakeholders, the Development Team, or the Scrum Master.

A Sprint would be cancelled if the Sprint Goal becomes obsolete. This might occur if the company changes direction or if market or technology conditions change. In general, a Sprint should be cancelled if it no longer makes sense given the circumstances. But, due to the short duration of Sprints, cancellation rarely makes sense.

When a Sprint is cancelled, any completed and “Done” Product Backlog items are reviewed. If part of the work is potentially releasable, the Product Owner typically accepts it. All incomplete Product Backlog Items are re-estimated and put back on the Product Backlog. The work done on them depreciates quickly and must be frequently re-estimated.

Sprint cancellations consume resources, since everyone regroups in another Sprint Planning to start another Sprint. Sprint cancellations are often traumatic to the Scrum Team, and are very uncommon.

Concepts

Subsections of Concepts

Definition of Ready

What is Definition of Ready?

Definition of Ready is the properties required for a task to be started. It has to be clear, open and transparent.

What are the perspectives that have to be covered?

  • User Story / Task
  • Sprint
  • Test

User Story / Task Perspective

User story has to cover all necessary items which are based on INVEST principles.

Invest principles items;

  • Independent(of all others)
  • Negotiable(not a contract for specific feature)
  • Valuable(a vertical slice - feature ownership)
  • Estimable(to decent approximation)
  • Small(enough to fit in a single iteration)
  • Testable(even if the tests don’t exist yet)

Accept an user story is ready, below items have to covered by the user story;

  • The conditions of satisfaction have been fully identified for the story.
  • The story details have to be understandable by the all scrum team.
  • The story has been estimated and is under a certain size which is defined by the scrum team.
  • The team’s user interface designer or Product Owner has mocked up, or even fully designed, any screens affected by the story.
  • All external dependencies have been resolved, whether the dependency was on another team or on an outside vendor.
  • Test environment or devices which is related the story, have to be ready.

Sprint Perspective

  • Prioritized sprint backlog
  • Defects, user stories and other work the team has committed to are contained in the sprint backlog
  • No hidden work, all backlog items have to be detailed enough for next sprint.
  • All team members have calculated their individual capacity for the sprint
  • All users stories meet the definition of Ready.

Test Perspective

  • Implementation or Work Item;

    • Has to be delivered as an increment.
    • Has to cover all definition of done rules.

    Test environment have to be ready for related item.

How the Definition of Ready should be?

Definition of Ready may not be covered all items which ared listed above. Project members have to select necessary items for their and customer needs. The items can be extended and teams can add their own custom rules to team’s definition of ready list. The most important rule is, each team member has to be beware of the definition of ready and follow the rules.

Definition of Ready Example

  • The conditions of satisfaction have been fully identified for the story.
  • The story details have to be understandable by the all scrum team.
  • The story has been estimated and is under a certain size which is defined by the scrum team.
  • Prioritized sprint backlog
  • Defects, user stories and other work the team has committed to are contained in the sprint backlog
  • Product backlog items have to be approved by the product owner.

Definition of Done

What is Definition of Done?

The Definition of Done is an agreed upon set of items that must be completed before a project, user story, test case, deployment steps etc. can be considered complete. It is applied consistently and serves as an official gate separating things from being “in progress” to “done.”

What are the perspectives that have to be covered?

  • Development
  • Test
  • Deployment
  • Documentation

Development Perspective

  • Code have to be written by following defined code formatting.
  • Comments have to be added to explain complex solutions.
  • Implementation have to be complete within defined code complexity levels
  • Any other third party solution(Library, Framework etc.) which endangers CDP, should not be used in implementation.
  • Before committing implementation, written code/solution have to be reviewed by at least other one developer.
  • If implementation needs integration with another module and the module has not implemented during implementation, mock data or mock module should be used to test implementation.

Test Perspective

  • Unit tests have to be written by developer.
  • All edge cases have to be tested by the developers.
  • If it is needed, to keep CI/CD pipeline alive, necessary updates have to be done on CI/CD configuration for tests.

Deployment Perspective

  • Implementation has to be tested by the testers before deployment.
  • Before deployment, tester has to complete all regression tests to be sure that implementation is not effects any other modules.
  • Before deployment, all automated tests have to be run. If test coverage below defined coverage percentage, implementation have to be rolled back.
  • If implementation uses third party solutions/app, the packages should be added for deployment environment(Docker or Yocto scripts)

Documentation Perspective

  • If implementation steps have complex solutions, developers have to write a document or update existing development documents to explain their solutions properly.

How the Definition of Done should be?

Definition of Done may not be covered all items which is listed above. Project members have to select necessary items for their and customer needs. The items can be extended and teams can add their own custom rules to team’s definition of done list. The most important rule is, each team member has to be beware of the definition of done and follow the rules.

Definition of Done Example

  • Code has to be written by following defined code formatting.
  • Comments have to be added to explain complex solutions.
  • Implementation has to be complete within defined code complexity levels
  • Change log has to be updated after each completed product backlog item.

Acceptance Criteria

Acceptance criteria are the conditions that a software product must meet to be accepted by a user, a customer, or other system. They are unique for each user story and define the feature behavior from the end-user’s perspective. Well-written acceptance criteria help avoid unexpected results in the end of a development stage and ensure that all stakeholders and users are satisfied with what they get.

Main purposes of the Acceptance Criteria is clarifying the stakeholder’s requirements.

Some of the criteria are defined and written by the product owner when he or she creates the product backlog. And the others can be further specified by the team during user stories discussions after sprint planning.

  • Acceptance Criteria have to be written before development starts.

  • Acceptance Criteria shouldn’t be too narrow.

  • Acceptance Criteria have to be achievable in one sprint iteration.

  • Acceptance Criteria have to be measurable and not too broad.

  • Acceptance Criteria shouldn’t contain Technical Details

  • Acceptance Criteria have to be understandable by all Scrum Team members

  • Acceptance Criteria have to be testable

Acceptance Criteria should contain;

  • Feature scope detalization

    Acceptance Criteria define the boundaries of user stories. They provide precise details on functionality that help the team understand whether the story is completed and works as expected.

  • Describing negative scenarios

    Acceptance Criteria may require the system to recognize unsafe password inputs and prevent a user from proceeding further. Invalid password format is an example of a so-called negative scenario when a user does invalid inputs or behaves unexpectedly. Acceptance Criteria define these scenarios and explain how the system must react on them.

  • Setting communication

    Acceptance criteria synchronize the visions of the client and the development team. They ensure that everyone has a common understanding of the requirements: Developers know exactly what kind of behavior the feature must demonstrate, while stakeholders and the client understand what’s expected from the feature.

  • Streamlining acceptance testing

    Acceptance criteria are the basis of the user story acceptance testing. Each acceptance criterion must be independently testable and thus have a clear pass or fail scenarios. They can also be used to verify the story via automated tests

  • Feature estimation

    Acceptance criteria specify what exactly must be developed by the team. Once the team has precise requirements, they can split user stories into tasks that can be correctly estimated.

Acceptance Criteria Template for User Story

Scenario the name for the behavior that will be described
Given the beginning state of the scenario
When specific action that the user makes
Then the outcome of the action in “When”
And used to continue any of three previous statements

Example;

User story: As a user, I want to be able to recover the password to my account, so that I will be able to access my account in case I forgot the password.

Scenario: Forgot password
Given: The user has navigated to the login page
When: The user selected forgot password option
And: Entered a valid email to receive a link for password recovery
Then: The system sent the link to the entered email
Given: The user received the link via the email
When: The user navigated through the link received in the email
Then: The system enables the user to set a new password

Source: https://www.altexsoft.com/blog/business/acceptance-criteria-purposes-formats-and-best-practices/

Source Control Management

Source control management is a key concept that enables developers work together where they can review each others code, develop new features without breaking each others implementations or doing the same work twice. git is the main SCM (source control management) tool that we use in BISS to store and share our code.

Most of the companies have their own guides and criteria for using the git based on their needs and requirements, for creating a better environment for developers and testers to work. In BISS, we have our own guides on how to use the git (with GitLab) that has been decided by the team to meet their requirements. Those guides are:

It can be seen that these guides are prepared with high flexibility in mind to serve all the different needs that might come using different technologies. They are also live guides meaning they evolve and change with new requirements and needs coming from our teams. At any given time, BISS uses these guides for source control management on their projects, thus, they form the standard and ensures the quality of our projects.

Subsections of Source Control Management

Commit Messages

Commit messages should be self explanatory with enough detail for developers, maintainers, testers and every other member of the development team to understand what exactly has changed with each commit.

  • Commit type that will give first hints about commit change.

    • “[+]”: New feature
    • “[#]”: Bug fix
    • “[~]”: Refactoring, general changes or others that doesn’t fit first two
  • Summary is the must have and it has two parts in it. First part is the name of the module and the second part is the summary of the change.

  • Description is made out of several parts, it can be considered as a template of explaining, giving enough detail on the changes about:

    • how algorithm works
    • what are the new dependencies
    • how this change solves the problem/creates solution
    • additional notes
    • relevant links (issues, other MRs etc.)
    • co-authors.
  • Use the imperative mood in the summary line while writing commit messages. A properly written summary line for a commit message should be able to complete the following sentence: “This commit will …”.

    • This commit will change the search algorithm.
    • This commit will the search algorithm is changed.

Other than summary, all the parts are optional yet, it is highly encouraged to use them. Template and example can be found below:

template:

[~#+] Module Name Abbreviation(if needed): Summarize the change in less than 50 characters

What is changed (if needed):
- Explain new algorithm.
- Explain new dependencies.

Because (if needed):
- Explain the reasons you made this change
- Make a new bullet for each reason
- Each line should be under 72 characters
Remarks (if needed):
Include any additional notes, relevant links, or co-authors.(if needed)

Issue: #AZURE_ISSUE_ID

example:

[~] search: Refactor algorithm

What is changed:
- The new algorithm's worst case O(n log(n)).
- "HyperSupperDupper Sort" library is not used anymore.

Because:
- Old algorithm was not optimized.
- System tend to crash with big data.

Remarks:
Corner cases were not covered. (see # 11231)

These changes should resolve issue # 1337.

This commit removed the getFirst(), so please stop using it!

Issue: #2019
Co-authored-by: cool.guy <cool.guy@bosphorusiss.com>

Check this article to read more about writing good commit messages. Another cool git commit can be found here.

Versioning

Versioning helps us to create cornerstones in a project so that we can understand the project state. In this part versioning and semantic versioning will be discussed.

Semantic Versioning

Why do we need it?

As the bigger our systems grow, and the more packages we integrate into our software; then releasing new package versions can start to become problematic:

  1. Version Lock: If we specify dependencies too strict then we can’t upgrade a package without upgrading all packages dependent on it.
  2. Version Promiscuity: If we specify dependencies too loose then we are being wishful about compatibility between different versions.

Semantic versioning allows us to convey what have changed from one version to the next, that way we can create clever dependency specifications and keep developing and releasing new versions of our packages without unnecessarily being have to update all dependent packages.

What is it?

Semantic versioning offers a scheme as below:

[MAJOR.MINOR.PATCH]

Version Incrementing Rules

Increment the:

  • MAJOR version when you make incompatible API changes. It MAY also include minor and patch level changes. Minor and patch version reset to 0 when major version incremented.
  • MINOR version when you add functionality in a backwards compatible manner. It MAY include patch level changes. Patch version reset to 0 when minor version incremented.
  • PATCH version when you make backwards compatible bug fixes.

Remarks

  • Software using semantic versioning MUST declare a public API. It should be precise and comprehensive.
  • MAJOR version 0 is for initial development. The public API should not be considered stable.
  • A bug fix is defined as an internal change that fixes incorrect behavior.

Reference: Semantic Versioning Specification

Semantic Versioning in Action

In this part we will develop a hypothetical application gradually and use semantic versioning along the way. Let’s say you’re building an application that is called network-manager. It has one initial requirement, it should return the IP address of network interface wherever it runs and that functionality should be available under /get-ip-address endpoint.


NOTE

There are several ways to communicate with the application. We can use arguments/options, listen for keyboard strokes, start a server inside and communicate via a client application. We’re not going into details but the idea is that an application one way or another presents interface to interact with the world around it and that part is called public API. It’s important to define which part of your software constitutes public API to use Semantic Versioning correctly.


After adding this functionality we can create a tag as v0.1.0 to point initial version.

If you run the application and reach for /get-ip-address endpoint, it responds as below:

{
    "interface": "enp0s3",
    "ip_address": "192.168.10.2/24"
}

After a certain amount of time you realized that it takes too much time to respond. You find out the reason and send a bugfix. Time to pump the version. This change was backward compatible because the application still responds the same way. Also we didn’t add new functionality. So no need to bump major or minor units, just increasing patch unit will be enough. So the new version is v0.1.1

It’s time to bring new functionalities to the table ! You realized that it would be a good idea to show MAC address and it should be reachable via /get-mac-address endpoint. After developing this functionality time to check if everything works fine.

So you run the application and ask for MAC address via /get-mac-address, here is the response:

{
    "interface": "enp0s3",
    "mac_address": "0a:0b:0c:0x:0y:0z"
}

It looks fine and we should give a new version. For now we have two different endpoints (/get-ip-address and /get-mac-address). Since we didn’t touch /get-ip-address endpoint, it still behaves as before and because we didn’t have any other than /get-ip-address, it’s okay to say this change was backward compatible. Yet this is a new feature, so we should bump minor unit. The new version is v0.2.0

Network-manager returns the first interface it reaches currently and because we only got one network interface in our workstation that was okay. But there might be more than one network interfaces where our application runs. The new goal is returning all IP and MAC addresses if applicable. After few changes, time to run basic checks in a different environment where we got two physical network interfaces:

/get-ip-address responds with:

[
    {
        "interface": "enp0s3",
        "ip_address": "192.168.10.2/24"
    },
    {
        "interface": "enp0s4",
        "ip_address": "192.168.11.2/24"
    } 
]

/get-mac-address responds with:

[
    {
        "interface": "enp0s3",
        "mac_address": "0a:0b:0c:0x:0y:0z"
    },
    {
        "interface": "enp0s4",
        "mac_address": "1a:1b:1c:1x:1y:1z"
    } 
]

Before this change endpoints were returning inside JSON objects, but now it returns JSON objects inside an array. This means consumer of the network-manager should change their code to be compatible with new version of network-manager and our change was not backward-compatible. We have to bump the major unit. The new version is v1.0.0

Branching Strategy

BISS Branching Strategy

Branching strategy points to activites a project team should execute for integration, deployment and even delivery. In this part we will explain what we use for branching on daily basis and briefly touch on several branching strategy.

BISS Flow

This is the first workflow attempt that addresses multiple teams way of working. It’s not done by any means and should improve over time.

BISS flow

Let’s look at the usage of each branch:

  • Production(purple) : This branch should point to production ready state of your software. Any merge request to production branch should result with a deployment to your prod environment
  • Master(red) : Integration point for feature branches. Feature branches should split and merge back here. Tagging should be done in master branch, do not need to tag when a feature branch is merged but there should be a tagging policy.
  • Feature(green) : Contains any improvement that will face customer/user soon.

Few more points:

  • Since dev branch serves mostly as melting pot and master branch is already doing that, we decided not to use in BISS flow.
  • Feature branch names should be brief but comprehensive and seperated with hyphen
  • We should use rebasing when updating feature branches from master
  • Testing should be done before merging back into master
  • If supporting more than one version is necessary, different branches might be used to reflect those versions (Up until now we (here in BISS) haven’t maintain more than one version of a software. Since this scenario is not clear yet, it would be too vague and impractical to put into BISS flow)

Other Branching Strategies

Git Flow

This is the oldest approach that aims to solve integration problem. It has permanent master and develop branches and feature, release, hotfix branches that live limited amount of time. Releasing the software is the main goal and branches are created with this idea in mind. Depending on the circumstances, temporary branches might merge into master and/or develop branches.

Let’s briefly touch each branch:

  • Master: Reflects what is alive at production
  • Develop: Melting pot for feature branches
  • Feature: Concentrates on a new feature
  • Release: Provides room for release preparation
  • Hotfix: Aims to solve unexpected problems at production

It has too many braches to think of, requires mostly manual steps to manage and demands git CLI knowledge.

GitHub Flow

This is the much simpler form of git flow. Instead of losing the momentum while playing branches it puts emphasize on deploying more often. Master branch should be in such a state that is deployable at any time. Apart from a permanent master branch, there are temporary feature branches that brings new feature or bug/security fixes into being.

It can be explained as below:

  • Master branch should be reliable, don’t break its integrity
  • Feature branches should have descriptive names, it should give the idea at first glance
  • Push to remote server as much as possible, since everyone works at their own branch you cannot break anything
  • Use pull requests for code review
  • Merge(not rebase) after pull request is accepted
  • Deploy frequently

Gitlab Flow

Gitlab flow is not so much different than GitHub flow in essence. It also utilizes permanent master and short-lived feature branches and offers merging feature branches back into master often. There are few points that make Gitlab flow different than git flow as well.

On top of what GitHub flow says, Gitlab flow offers few additional branches for different needs:

  • Production branch: If deployment is not possible at a time, we can create a branch that reflects what should be in production environment. So team can continue working with master branch
  • Environment branches: If there are other environments other than production, such as staging and pre-production, we can employ new branches with corresponding name to reflect those environments
  • Release branches: If releasing(not deploying) is the need, then we can utilize release branches. Let’s say a bug fix is cruical, we should first try to merge into master and then cherry-pick into release branch. So that it doesn’t occur again and again

In order to prevent not needed merge commits, it offers rebasing when updating a branch from master, but when merging back into master branch opt for merging.

Since master branch is accepted as reliable, Gitlab flow promotes testing before merging back into master.

Merge Requests

A Merge Request (MR) is a request to merge one branch into another.

Use merge requests to visualize and collaborate on proposed changes to source code

How to create a merge request?

Before creating a merge request, read through an introduction to Merge Requests to familiarize yourself with the concept, the terminology, and to learn what you can do with them.

Every merge request starts by creating a branch. You can either do it locally through the command line, via a Git CLI application, or through the GitLab UI.

  1. Create a branch and commit your changes

    CLI Example git checkout -b "feature_branch" // Create a local branch with checkout

    You can also create a branch from Web Application, it depends on your work style. If you are creating a branch from GitLab UI and developing it from your favorite IDE; these commands will help you out:

    git fetch
    git checkout feature_branch

    After creating a branch you should add your changes and commit your changes with commit message. For example:

    git add src/* // Add every changed file located at /src path
    git commit -m "Add Login Endpoint."
  2. Push your local branch to remote git push --set-upstream origin feature_branch // Push your local branch to remote Now you are ready to create your merge request.

  3. Create a Merge Request

When you start a new merge request, regardless of the method, you are taken to the New Merge Request page to fill it with information about the merge request.

Important Notes:
*Always create merge request to source branch(the branch where you created new branch from).
For example if you created a branch from 'dev',open your merge request to 'dev'. Not 'master' or any other branches.

When creating merge request follow these steps listed below

  • Assign the merge request to a colleague for review. Generally more than one assignees are better.

  • Set a milestone to track time-sensitive changes.

  • Add labels to help contextualize and filter your merge requests over time.

  • Attach a related issue.

  • Add merge request dependencies to restrict it to be merged only when other merge requests have been merged.

  • Set the merge request as a Draft to avoid accidental merges before it is ready. While doing that you can use title prefix: WIP:.Don’t forget to add description line when it will be ready.

  • Write a description for changes (It’s also helps reviewers for understanding what are they looking at.) While writing a merge request description be sure you are helping reviewer to what he/she is looking at. Otherwise you should okay with your colleagues closing your merge request without merging it.

    Description Example:

    ## What does this MR Do?
    * Adds Session Endpoint Paths to API Path List
    * Reconfigure Public, User and Techinician Role Available API Path Lists.
    * Adds Login, Logout and ValidateSession Endpoints
    
    Closes #25!(Session Implementation)
  • Once you have created the merge request, you can follow these subsections to finalize the work:

Merge Request Reviews

  • Pipeline should successfully done.
  • Check whether MR description is done.
  • Review code carefully (Check How to review section)
  • If you have any discussion point, comment each one as a different topic. (Check How to discuss section)
  • If all threads/requested changes are resolved, merge it(Always FastForward).

How to review?

  • Perform a Review in order to create multiple comments on a diff and publish them once you’re ready.
  • Perform inline code reviews.
  • Add code suggestions to change the content of merge requests directly into merge request threads, and easily apply them to the codebase directly from the UI.
  • If everything looks ok, please approve the code with a comment so that new any other reviewer can see your comment and close the MR if needed.

How to discuss?

  • Company public language is English. Be aware of that
  • Always try to be constructive
  • Explain every details of problem to transfer your idea/concerns clearly

Kanban

WAITING INPUTS FROM “SAYIN TOP”

Subsections of Coding Guideline

C++ Coding Guideline

This page contains data about how we refactor, format and write our code with C++.

We decided not to invent wheel again and again so that, we’re using every clang tools as base tool in our projects. Firstly, we’ll start with how we format our code.

  • There’re two major tool(IDE or Editor) that we use currently: VS Code and Eclipse. You might know that VS Code has internal clang format support. Only thing that you should do is adding your clang-format file into project folder(Name of file must be like this: .clang-format ). For Eclipse, you need a simple plugin. You can follow this guideline to use with it.

  • As we said before, no need to reinvent the wheel. There are generally accepted coding standards. LLVM, Google, Mozilla and list go on. We decided to continue with LLVM but it needs some fixes.

  • At BISS, we’re using this formatter for C/C++ Project. Please don’t alter any line of this file without noticing Process Design team.

    • You can also check this interactive web tool in order to see what LLVM applies on your code. Just select BasedOnType as LLVM.

C# Coding Guideline

C# is a general-purpose, modern and object-oriented programming language pronounced as “C Sharp”. It was developed by Microsoft led by Anders Hejlsberg and his team within the .NET initiative and was approved by the European Computer Manufacturers Association (ECMA) and International Standards Organization (ISO). C# is among the languages for Common Language Infrastructure. C# is a lot similar to Java syntactically and is easy for users who have knowledge of C, C++, or Java.

Below are some of the best practices which all the .Net Developers should follow:

  • Class and Method names should always be in Pascal Case
public class Employee
{
    public Employee GetDetails()
    {
        //...
    }
    public double GetBonus()
    {
        //...
    }
}
  • Method argument and Local variables should always be in Camel Case
public class Employee
{
    public void PrintDetails(int employeeId, String firstName)
    {
        int totalSalary = 2000;
        // ...
    }
}
  • Avoid the use of underscore while naming identifiers
// Correct
int employeeId;
string employeeName;
bool isActive;


// Avoid
Int32 employee_id;
String employee_name;
Boolean is_active;
  • Always prefix an interface with letter I.
// Correct
public interface IEmployee
{
}
public interface IShape
{
}
public interface IAnimal
{
}

// Avoid
public interface Employee
{
}
public interface Shape
{
}
public interface Animal
{
}
  • For better code indentation and readability always align the curly braces vertically.
// Correct
class Employee
{
    static void PrintDetails()
    {
    }
}


// Avoid
class Employee
    {
    static void PrintDetails()
    {
      }
}
  • Always use the using keyword when working with disposable types. It automatically disposes the object when program flow leaves the scope.
using(var conn = new SqlConnection(connectionString))
{
    // use the connection and the stream
    using (var dr = cmd.ExecuteReader())
    {
     //
    }
}
  • Always declare the variables as close as possible to their use.
// Correct
String firstName = "Shubham";
Console.WriteLine(firstName);
//--------------------------
ExampleFunction();
AnotherFunction();
AnotherBusinessLogic();


// Avoid
String firstName = "Shubham";
ExampleFunction();
AnotherFunction();
AnotherBusinessLogic();
Console.WriteLine(firstName);
  • Always declare the properties as private so as to achieve Encapsulation and ensure data hiding.
// Correct
private int employeeId { get; set; }

// Avoid
public int employeeId { get; set; }
  • Always seperate the methods, different sections of program by one space.
// Correct
class Employee
{
	private int employeeId { get; set; }

	public void PrintDetails()
	{
	//------------
	}
}

// Avoid
class Employee
{

	private int employeeId { get; set; }


	public void PrintDetails()
	{
	//------------
	}

}
  • Constants should always be declared in UPPER_CASE.
// Correct
public const int MIN_AGE = 18;
public const int MAX_AGE = 60;

// Avoid
public const int Min_Age = 18;
public const int Max_Age = 60;
  • Use singular names for enums. Exception: bit field enums.
// Correct
public enum Color
{
    Red,
    Green,
    Blue,
    Yellow,
    Magenta,
    Cyan
}

// Exception
[Flags]
public enum Dockings
{
    None = 0,
    Top = 1,
    Right = 2,
    Bottom = 4,
    Left = 8
}

// Avoid
public enum Cars //Plural
{
    Bugatti,
    Ferrari,
    Ford,
    Audi,
    BMW
}
  • Naming Convention Examples
Language element Casing Example
Namespace Pascal System.Drawing
Type parameter Pascal TView
Interface Pascal IBusinessService
Class, struct Pascal AppDomain
Enum Pascal ErrorLevel
Enum member Pascal FatalError
Resource key Pascal SaveButtonTooltipText
Constant field Pascal MaximumItems
Private static readonly field Pascal RedValue
Private field Camel listItem
Non-private field Pascal MainPanel
Property Pascal BackColor
Event Pascal Click
Method Pascal ToString
Local function Pascal FormatText
Parameter Camel typeName
Tuple element names Pascal (string First, string Last) name = ("John", "Doe"); var name = (First: "John", Last: "Doe"); (string First, string Last) GetName() => ("John", "Doe");
Variables declared using tuple syntax Camel (string first, string last) = ("John", "Doe"); var (first, last) = ("John", "Doe");
Local variable Camel listOfValues

Note: in case of ambiguity, the rule higher in the table wins.

  • Use string interpolation to concatenate short strings, as shown in the following code.
string displayName = $"{nameList[n].LastName}, {nameList[n].FirstName}";
  • To append strings in loops, especially when you are working with large amounts of text, use a StringBuilder object.
var phrase = "lalalalalalalalalalalalalalalalalalalalalalalalalalalalalala";
var manyPhrases = new StringBuilder();
for (var i = 0; i < 10000; i++)
{
    manyPhrases.Append(phrase);
}
//Console.WriteLine("tra" + manyPhrases);
  • Lambda Expression
  public Form2()
  {
      // You can use a lambda expression to define an event handler.
      this.Click += (s, e) =>
          {
              MessageBox.Show(
                  ((MouseEventArgs)e).Location.ToString());
          };
  }
  • Linq Queries
var localDistributors =
    from customer in customers
    join distributor in distributors on customer.City equals distributor.City
    select new { Customer = customer, Distributor = distributor };

C Coding Guideline

This document is prepared to help developers about how to write the code. It contains different types of code language rules. These rules make writing, maintaining, reviewing the code easier. Also some rules increase portability, …

Horizontal Spacing

Tab usage with space

In most projects, we are using number of spaces instead of using the tab character(\t). Most cases 4 spaces could be use for tab key. This can be set from settings of most IDE’s.

Unary Operators

The unary operators are written with no space between the operator and the operand.

!value 
~bits 
++i 
j-- 
(CPU_INT32U)x 
*ptr 
&x 
sizeof(x)

Binary Operators

The binary operators (and the ternary operator) are written with at least on space between the operator and operands.

c1 = c2; 
x + y 
i += 2; 
n > 0 ? n : -n 
a < b 
c >= 2

Expressions

Expressions within parentheses are written with no space after the opening parenthesis and no space before the closing parenthesis.

x = (a + b) * c;

if and if-else statements

if(x < y)
{
    return -1;
}
else if(x > y)
{
    return 1;
}
else
{
    return 0;
}

while, do-while and for loops

while(condition)
{
}

do
{
} while(condition);

for(int i = 0, j = argc; i < argc; i++, j--)
{
}

switch-case statements

switch(number)
{
case RED:
    return GREEN;
case GREEN:
    return BLUE;
case BLUE:
    return RED;
default:
    return BLACK;
}

Class definition

namespace examplenamespace {
    class ExampleClass {
        public:
            ExampleClass(int arg1, char arg2, char* arg3);
            ~ExampleClass();
            void public_func(char arg);
        private:
        	char class_member;
            void private_func(int arg);
    };
}

Naming Convention

In this section, there are some naming convention rules for C language.

These rules can be applied to:

  • Public and local functions
  • Typedef struct and enumeration
  • Public and local variables

Public and Local Functions

Naming convention of functions is important because if there is a good naming for functions, it would be easy to read the code.

Public Functions

Public functions can be called from another files. So it is better to put some prefix before function name:

Example:

void network_stackMgmt(int code);
bool uartIO_txEnable(void);

Local Functions

Local functions can be called only from inside the file that the function is written. So there is no need to put a prefix before function name:

static void clearBuffer(void);
static bool getState(int index);

Typedef Struct and Enumeration

Naming convention of typedef structures and enumerations is important because if there is a good naming, it would be easy to read the code.

Struct

If there is a good naming for the structure definition, it would be easy to read the code.

struct s_deviceManagerRing {
    uint8 link;
	char mac[18];
};

Typedef Struct

If there is a good naming for the typedef structure definition, it would be easy to read the code.

typedef struct {
    uint64_t mac;
    char ipServer[48];
    uint16_t portServer;
    uint16_t portClient;
} ts_gsmNet;

Enumeration

İf there is a good naming for the enumeration definition, it would be easy to read the code.

enum e_deviceManagerStates {
    E_DEVICE_MANAGER_INIT = 0,
	E_DEVICE_MANAGER_START,
	E_DEVICE_MANAGER_STOP,
};

Typedef Enumeration

If there is a good naming for the typedef enumeration definition, it would be easy to read the code.

typedef enum {
    E_DIO_E_INPUT_1 = 0,
} te_dioInputs;

Public and Local Variables

Naming convention of variables is important because if there is a good naming for variables, it would be easy to read the code.

Public Variables

Public variables can be used from another files. So it is important to have a prefix before the variable name like this:

char uartIO_respReady[6] = "READY";
char lon_respSet[6] = "SET\r\n";

Local Variables

Local variables can be used from only the file that they are written inside. So it is not important to have a prefix before the variable name.

static bool up;
static uint64_t local;
static uint8_t button;

File Content

It is better to have sections inside the file in every coding language. In this section there are some rules about file content.

File content should be separated with some comment blocks. So this way, it would be easy to find what we are looking for in the file content.

To get a documentation from the comments, Doxygen format is used for comments.

Doxygen Comment Blocks

This section is prepared to give some information about doxygen comment blocks and how to write them.

Function Documentation

Here is one example:

/**
* \brief Initializes the UART handle.
* \param config UART configuration string (ex. "COM1:115200,N,8,1")
* \return Returns a handle to the newly opened UART
*/
UART_HandleTypeDef *uartOpen(char *config)
{
    ...
}

Variable Documentation

Here is one example:

static uint8 mode[2]; /**< Uart mode * /

Define Documentation

Here is one example:

/* UART configuration */
#define UARTIO_EVEN     FALSE /**< Even parity */
#define UARTIO_PARITY   FALSE /**< Parity enabled */
#define UARTIO_WORDLEN  E_AHI_UART_WORD_LEN_8 /**< Word length */
#define UARTIO_ONESTOP  TRUE /**< One stop bit */

File Heading

A comment block must be placed at the beginning of each source code file (both code and header files) containing;

  • Filename
  • Brief(short description)
  • Details(detailed description)
  • Remarks(additional remarks)

Here is one example comment block:

/**
 * \file        Filename
 * \brief       A brief description, one sentence, one line.
 * \details     A detailed description of the file scope, it can span over
 *              multiple lines, can be omitted.
 * \remarks     Additional remarks.
 */

File Layout

Both source and header files must be divided by sections:

  • INCLUDE FILES
  • MACRO DEFINITIONS
  • LOCAL DATA TYPES
  • LOCAL CONSTANTS
  • VARIABLES
  • LOCAL FUNCTION PROTOTYPES
  • PUBLIC FUNCTION
  • LOCAL FUNCTION

Even if the section is empty, it’s comment block must be added to the file:

/*----------------------------< Section Name >--------------------------*/

Include Section

The INCLUDE FILES section should include all necessary header files.

/*------------------------------< Includes >-----------------------------*/
#include <iostream>
#include <thread>

Macro Definitions Section

The MACRO DEFINITIONS section should include all necessary macro defines.

/*--------------------------< Macro Definitions >-----------------------*/
#ifndef TRACE_APP
#define TRACE_APP	TRUE
#endif

Local Constants Section

The LOCAL CONSTANTS section should include all necessary constant variables.

/*--------------------------< Constants >-------------------------------*/
const uint32 msecCount = 1800;

Local Data Types Section

The LOCAL DATA TYPES section should include all necessary data type definitions.

/*----------------------------< Typedefs >-------------------------------*/
typedef struct
{
	bool	 rts;			/**< Current RTS setting */
	bool	 cts;			/**< Current CTS setting */
} 	ts_uart;

Local Variables Section

The LOCAL VARIABLES section should include all necessary local(static) variables.

/*---------------------------< Variables >------------------------------*/
static uint8 uart = APP_UART_0;

Local Function Prototypes Section

The LOCAL FUNCTION PROTOTYPES section should include all necessary local(static) function prototypes.

/*-------------------------< Prototypes >-----------------------------*/
static void delayMsec(uint32 period);

Public Function Section

The PUBLIC FUNCTION section should include all necessary public function declarations.

/*---------------------------< Public Function >------------------------*/
void dio_outputInitialise(void)
{
...
}

Local Functions Section

The LOCAL FUNCTION section should include all necessary local(static) function declarations.

/*-------------------------< Private Function >--------------------------*/
static void initialiseApp(void)
{
    ...
}

Abbreviations

Please refer to here to see abbreviations.

Subsections of Templates

Changelog Template

Here you can find a template for project Changelog below.

Legend:

  • “[+]”: New feature
  • “[#]”: Bug fix
  • “[~]”: Refactoring, general changes or others that doesn’t fit first two
# Changelog

## [Unreleased]

- [+] "Frequently Asked Questions" section.
- [~] Remove empty sections from CHANGELOG, they occupy too much space and
  create too much noise in the file. People will have to assume that the
  missing sections were intentionally left out because they contained no
  notable changes.

## [v4.0.0] - 2023-06-20

- [+] "Why keep a changelog?" section.
- [+] New "Guiding Principles" sub-section to "How do I make a changelog?".
- [#] Improve "Commit log diffs" sub-section to further argument against
  them.
- [#] Fix typos in Brazilian Portuguese translation.
- [~] Clarified the section on "Is there a standard change log format?".

## [v3.4.1] - 2022-06-20
- [#] Merge "Why can’t people just use a git log diff?" with "Commit log
  diffs"
- [#] Fix typos in Simplified Chinese and Traditional Chinese translations.
- [+] "Who needs a changelog?" section.
- [+] "How do I make a changelog?" section.
- [~] Remove empty sections from CHANGELOG, they occupy too much space and
  create too much noise in the file. People will have to assume that the
  missing sections were intentionally left out because they contained no
  notable changes.
- [~] Clarified the section on "Is there a standard change log format?".

ReadME Template

Here you can find a template for project ReadMe below.

## Your Coolest Project Name

Basic information about your cool project goes here.

*Assume your project is an React project forked from `create-react-app`*

#### Development Environment

Give information about how to prepare a development environment for your coolest project.

*Example:*
*This project uses `nodejs 14.15.5` with `npm 7.5.3`*

*After cloning this project and installing nodejs In the project directory, you have to run:*

*`npm install`*

*and your development environment is ready.*

If you are using a tool formatting such as prettier, clang etc. don't forget to give information about this also.


#### Available Scripts

After preparing development environment give information for available scripts. 

***Examples:***

*In the project directory, you can run:*

### *`npm start`*

*Runs the app in the development mode.<br  />*

*Open [http://localhost:3000](http://localhost:3000) to view it in the browser.*

*The page will reload if you make edits.<br  />*

*You will also see any lint errors in the console.*

### *`npm test`*

*Launches the test runner in the interactive watch mode.<br  />*

*See the section about [running tests](https://facebook.ggithub.io/create-react-app/docs/running-tests) for more information.*

### *`npm run build`*

*Builds the app for production to the `build` folder.<br  />*

*It correctly bundles React in production mode and optimizes the build for the best performance.*

*The build is minified and the filenames include the hashes.<br  />*

*Your app is ready to be deployed!*

### *npm run pretty*

*Format all of your code with our prettier configuration.<br/>*

*You commits are ready to push!*


#### Dependencies

List your cooles project's dependencies as a list in this section, it could be a library, other microservice etc. 

#### Additional Sections

Add sections for developer guideline, third party library usage examples, how to deploy manually, project's configuration, etc.  

*If anything is need to be known, go on add a new section for that knowledge!* 

#### Contributors

Mention the contributors


Finally, motivate the developer who will be working the coolest project with this PS:

*Happy Hacking!*

clang Formatter

You can find the clang formatter that is being used on BISS projects below.


---
BasedOnStyle: LLVM
IndentWidth: '4'
---
Language: Cpp
AlignAfterOpenBracket: Align
AlignConsecutiveAssignments: 'false'
AlignConsecutiveBitFields: 'false'
AlignConsecutiveDeclarations: 'false'
AlignConsecutiveMacros: 'true'
AlignEscapedNewlines: Left
AlignOperands: 'true'
AlignTrailingComments: 'true'
AllowAllArgumentsOnNextLine: 'true'
AllowAllConstructorInitializersOnNextLine: 'true'
AllowAllParametersOfDeclarationOnNextLine: 'true'
AllowShortBlocksOnASingleLine: 'Always'
AllowShortCaseLabelsOnASingleLine: 'false'
AllowShortEnumsOnASingleLine: 'false'
AllowShortFunctionsOnASingleLine: Empty
AllowShortIfStatementsOnASingleLine: Never
AllowShortLambdasOnASingleLine: Empty
AllowShortLoopsOnASingleLine: 'false'
AlwaysBreakAfterReturnType: 'None'
AlwaysBreakBeforeMultilineStrings: 'false'
AlwaysBreakTemplateDeclarations: 'Yes'
BinPackArguments: 'true'
BinPackParameters: 'true'
BreakBeforeBinaryOperators: 'None'
BreakBeforeBraces: Allman
#BreakBeforeConceptDeclarations: 'false'
BreakBeforeTernaryOperators: 'true'
BreakConstructorInitializers: BeforeColon
BreakInheritanceList: BeforeColon
BreakStringLiterals: 'true'
ColumnLimit: '100'
CompactNamespaces: 'false'
ConstructorInitializerAllOnOneLineOrOnePerLine: 'false'
ContinuationIndentWidth: '4'
Cpp11BracedListStyle: 'true'
#EmptyLineBeforeAccessModifier: LogicalBlock
FixNamespaceComments: 'true'
IncludeBlocks: 'Regroup'
#IndentAccessModifiers: 'true'
IndentCaseBlocks: 'false'
IndentCaseLabels: 'true'
IndentExternBlock: 'Indent'
IndentPPDirectives: 'None'
#IndentRequires: 'true'
IndentWrappedFunctionNames: 'true'
MaxEmptyLinesToKeep: '1'
NamespaceIndentation: 'None'
PointerAlignment: Left
ReflowComments: 'true'
SortIncludes: 'true'
SortUsingDeclarations: 'true'
SpaceAfterCStyleCast: 'false'
SpaceAfterLogicalNot: 'false'
SpaceAfterTemplateKeyword: 'false'
#SpaceAroundPointerQualifiers: 'Default'
SpaceBeforeAssignmentOperators: 'true'
#SpaceBeforeCaseColon: 'false'
SpaceBeforeCpp11BracedList: 'false'
SpaceBeforeCtorInitializerColon: 'true'
SpaceBeforeInheritanceColon: 'true'
SpaceBeforeParens: ControlStatements
SpaceBeforeRangeBasedForLoopColon: 'true'
SpaceBeforeSquareBrackets: 'false'
SpaceInEmptyParentheses: 'false'
SpacesBeforeTrailingComments: '2'
SpacesInAngles: 'false'
SpacesInCStyleCastParentheses: 'false'
SpacesInConditionalStatement: 'false'
SpacesInContainerLiterals: 'false'
SpacesInParentheses: 'false'
SpacesInSquareBrackets: 'false'
Standard: c++20
TabWidth: '4'
UseCRLF: 'false'
UseTab: Never
---
Language: Proto
BasedOnStyle: Google
...

Subsections of Other

Wednesday Breakfasts

Wednesday is BISS’s breakfast day, right in the middle of the week. Unlike any other day, we mark it on our calendars, everyone tries to be in the office, and we prepare breakfast together, chatting while wrapping simit around our eggs. 🥚🥐

The main goal is to take time for each other amidst the busyness of work and life, to chat, listen to each other, and unwind. We specifically chose breakfast for this. Breakfast holds a special place in our culture. We love preparing diverse breakfasts with various ingredients for our loved ones, and on those breakfast tables, we enjoy long conversations. Especially on Sunday mornings, the whole family gathers for breakfast, sharing laughter and warmth, feeling the joy of being together. 🍞

Wednesday morning breakfasts at BISS are like a family reunion on a Sunday morning.

Every Wednesday at 8:30 am, we all gather in the kitchen. Everyone takes on a task. Some chop cucumbers and tomatoes, others take plates and set the tables. Meanwhile, one person goes to get fresh simit for our breakfast. Every Wednesday, we have fried eggs on our table, and if our boss is in the office, he always make it. 🍳

After all the preparations, we continue our breakfast with music and lively conversations. We enjoy the breakfast we prepared together and then clean up together.🍎

Being together, sharing something outside of work, and having conversations give us a sense of peace and happiness.❤️

Food Rules

Please follow this manual before ordering, eating any eatable thing.


Subsections of Food Rules

Pizza

Before ordering pizza, please follow below guide and decide order’s size…

pizza

Once you have finished with pizza, throw the boxes to the bin.

GYM Rules

Has your back started to ache due to sitting all day at work? Do you want to increase movement in your life? Then, BISS GYM is waiting for you.

Join us on Mondays and Thursdays from 11:30 AM to 12:30 PM for 2 days a week of guided workouts with a personal trainer to add some activity to your life

Before the workout

Don’t forget to bring the necessary items for your workout

  • 1 sport towel
  • An extra pair of shoes for gym to use
  • 1 shower towel

After the workout

  • Properly organize and put away the used equipment
  • If it’s winter, turn off the heaters when leaving

BONUS

Is exercising twice a week not enough? Then, we invite you to join the small indulgences that fitness enthusiasts gather for every Wednesday at 7:00 AM.