Commit Messages
Commit messages should be self explanatory with enough detail for developers, maintainers, testers and every other member of the development team to understand what exactly has changed with each commit.
-
Commit type that will give first hints about commit change.
- “[+]”: New feature
- “[#]”: Bug fix
- “[~]”: Refactoring, general changes or others that doesn’t fit first two
-
Summary is the must have and it has two parts in it. First part is the name of the module and the second part is the summary of the change.
-
Description is made out of several parts, it can be considered as a template of explaining, giving enough detail on the changes about:
- how algorithm works
- what are the new dependencies
- how this change solves the problem/creates solution
- additional notes
- relevant links (issues, other MRs etc.)
- co-authors.
-
Use the imperative mood in the summary line while writing commit messages. A properly written summary line for a commit message should be able to complete the following sentence: “This commit will …”.
- This commit will change the search algorithm.
- This commit will
the search algorithm is changed.
Other than summary, all the parts are optional yet, it is highly encouraged to use them. Template and example can be found below:
template:
[~#+] Module Name Abbreviation(if needed): Summarize the change in less than 50 characters

What is changed (if needed):
- Explain new algorithm.
- Explain new dependencies.

Because (if needed):
- Explain the reasons you made this change
- Make a new bullet for each reason
- Each line should be under 72 characters
Remarks (if needed):
Include any additional notes, relevant links, or co-authors.(if needed)

Issue: #AZURE_ISSUE_ID
example:
[~] search: Refactor algorithm

What is changed:
- The new algorithm's worst case O(n log(n)).
- "HyperSupperDupper Sort" library is not used anymore.

Because:
- Old algorithm was not optimized.
- System tend to crash with big data.

Remarks:
Corner cases were not covered. (see # 11231)

These changes should resolve issue # 1337.

This commit removed the getFirst(), so please stop using it!

Issue: #2019
Co-authored-by: cool.guy <cool.guy@bosphorusiss.com>
Check this article to read more about writing good commit messages.
Another cool git commit can be found here.
Versioning
Versioning helps us to create cornerstones in a project so that we can
understand the project state. In this part versioning and semantic
versioning will be discussed.
Semantic Versioning
Why do we need it?
As the bigger our systems grow, and the more packages we integrate into
our software; then releasing new package versions can start to become
problematic:
- Version Lock: If we specify dependencies too strict then we can’t
upgrade a package without upgrading all packages dependent on it.
- Version Promiscuity: If we specify dependencies too loose then we
are being wishful about compatibility between different versions.
Semantic versioning allows us to convey what have changed from one
version to the next, that way we can create clever dependency
specifications and keep developing and releasing new versions of our
packages without unnecessarily being have to update all dependent
packages.
What is it?
Semantic versioning offers a scheme as below:
[MAJOR.MINOR.PATCH]
Version Incrementing Rules
Increment the:
- MAJOR version when you make incompatible API changes. It MAY also
include minor and patch level changes. Minor and patch version reset
to 0 when major version incremented.
- MINOR version when you add functionality in a backwards compatible
manner. It MAY include patch level changes. Patch version reset to 0
when minor version incremented.
- PATCH version when you make backwards compatible bug fixes.
Remarks
- Software using semantic versioning MUST declare a public API. It
should be precise and comprehensive.
- MAJOR version 0 is for initial development. The public API should not
be considered stable.
- A bug fix is defined as an internal change that fixes incorrect
behavior.
Reference: Semantic Versioning Specification
Semantic Versioning in Action
In this part we will develop a hypothetical application gradually and
use semantic versioning along the way. Let’s say you’re building an
application that is called network-manager. It has one initial
requirement, it should return the IP address of network interface
wherever it runs and that functionality should be available under
/get-ip-address endpoint.
NOTE
There are several ways to communicate with the application. We can use
arguments/options, listen for keyboard strokes, start a server inside
and communicate via a client application. We’re not going into details
but the idea is that an application one way or another presents
interface to interact with the world around it and that part is called
public API. It’s important to define which part of your software
constitutes public API to use Semantic Versioning correctly.
After adding this functionality we can create a tag as v0.1.0 to point
initial version.
If you run the application and reach for /get-ip-address endpoint, it
responds as below:
{
    "interface": "enp0s3",
    "ip_address": "192.168.10.2/24"
}
After a certain amount of time you realized that it takes too much time
to respond. You find out the reason and send a bugfix. Time to pump the
version. This change was backward compatible because the application
still responds the same way. Also we didn’t add new functionality. So no
need to bump major or minor units, just increasing patch unit will be
enough. So the new version is v0.1.1
It’s time to bring new functionalities to the table ! You realized that
it would be a good idea to show MAC address and it should be reachable
via /get-mac-address endpoint. After developing this functionality time
to check if everything works fine.
So you run the application and ask for MAC address via /get-mac-address,
here is the response:
{
    "interface": "enp0s3",
    "mac_address": "0a:0b:0c:0x:0y:0z"
}
It looks fine and we should give a new version. For now we have two
different endpoints (/get-ip-address and /get-mac-address). Since we
didn’t touch /get-ip-address endpoint, it still behaves as before and
because we didn’t have any other than /get-ip-address, it’s okay to say
this change was backward compatible. Yet this is a new feature, so we
should bump minor unit. The new version is v0.2.0
Network-manager returns the first interface it reaches currently and
because we only got one network interface in our workstation that was
okay. But there might be more than one network interfaces where our
application runs. The new goal is returning all IP and MAC addresses if
applicable. After few changes, time to run basic checks in a different
environment where we got two physical network interfaces:
/get-ip-address responds with:
[
    {
        "interface": "enp0s3",
        "ip_address": "192.168.10.2/24"
    },
    {
        "interface": "enp0s4",
        "ip_address": "192.168.11.2/24"
    }
]
/get-mac-address responds with:
[
    {
        "interface": "enp0s3",
        "mac_address": "0a:0b:0c:0x:0y:0z"
    },
    {
        "interface": "enp0s4",
        "mac_address": "1a:1b:1c:1x:1y:1z"
    }
]
Before this change endpoints were returning inside JSON objects, but now
it returns JSON objects inside an array. This means consumer of the
network-manager should change their code to be compatible with new
version of network-manager and our change was not backward-compatible.
We have to bump the major unit. The new version is v1.0.0
Branching Strategy
BISS Branching Strategy
Branching strategy points to activites a project team should execute for integration, deployment and even delivery. In this part we will explain what we use for branching on daily basis and briefly touch on several branching strategy.
BISS Flow
This is the first workflow attempt that addresses multiple teams way of working. It’s not done by any means and should improve over time.
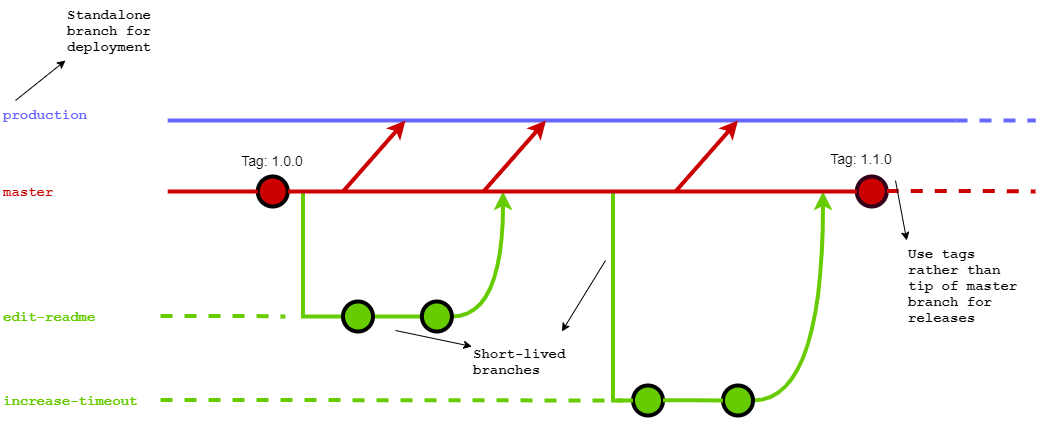
Let’s look at the usage of each branch:
- Production(purple) : This branch should point to production ready state of your software. Any merge request to production branch should result with a deployment to your prod environment
- Master(red) : Integration point for feature branches. Feature branches should split and merge back here. Tagging should be done in master branch, do not need to tag when a feature branch is merged but there should be a tagging policy.
- Feature(green) : Contains any improvement that will face customer/user soon.
Few more points:
- Since dev branch serves mostly as melting pot and master branch is already doing that, we decided not to use in BISS flow.
- Feature branch names should be brief but comprehensive and seperated with hyphen
- We should use rebasing when updating feature branches from master
- Testing should be done before merging back into master
- If supporting more than one version is necessary, different branches might be used to reflect those versions (Up until now we (here in BISS) haven’t maintain more than one version of a software. Since this scenario is not clear yet, it would be too vague and impractical to put into BISS flow)
Other Branching Strategies
Git Flow
This is the oldest approach that aims to solve integration problem. It has permanent master and develop branches and feature, release, hotfix branches that live limited amount of time. Releasing the software is the main goal and branches are created with this idea in mind. Depending on the circumstances, temporary branches might merge into master and/or develop branches.
Let’s briefly touch each branch:
- Master: Reflects what is alive at production
- Develop: Melting pot for feature branches
- Feature: Concentrates on a new feature
- Release: Provides room for release preparation
- Hotfix: Aims to solve unexpected problems at production
It has too many braches to think of, requires mostly manual steps to manage and demands git CLI knowledge.
GitHub Flow
This is the much simpler form of git flow. Instead of losing the momentum while playing branches it puts emphasize on deploying more often.
Master branch should be in such a state that is deployable at any time. Apart from a permanent master branch, there are temporary feature branches that brings new feature or bug/security fixes
into being.
It can be explained as below:
- Master branch should be reliable, don’t break its integrity
- Feature branches should have descriptive names, it should give the idea at first glance
- Push to remote server as much as possible, since everyone works at their own branch you cannot break anything
- Use pull requests for code review
- Merge(not rebase) after pull request is accepted
- Deploy frequently
Gitlab Flow
Gitlab flow is not so much different than GitHub flow in essence. It also utilizes permanent master and short-lived feature branches and offers merging feature branches back into master often. There are few points that make Gitlab flow different than git flow as well.
On top of what GitHub flow says, Gitlab flow offers few additional branches for different needs:
- Production branch: If deployment is not possible at a time, we can create a branch that reflects what should be in production environment. So team can continue working with master branch
- Environment branches: If there are other environments other than production, such as staging and pre-production, we can employ new branches with corresponding name to reflect those environments
- Release branches: If releasing(not deploying) is the need, then we can utilize release branches. Let’s say a bug fix is cruical, we should first try to merge into master and then cherry-pick into release branch. So that it doesn’t occur again and again
In order to prevent not needed merge commits, it offers rebasing when updating a branch from master, but when merging back into master branch opt for merging.
Since master branch is accepted as reliable, Gitlab flow promotes testing before merging back into master.
Merge Requests
A Merge Request (MR) is a request to merge one branch into another.
Use merge requests to visualize and collaborate on proposed changes to source code
How to create a merge request?
Before creating a merge request, read through an introduction to Merge Requests to familiarize yourself with the concept, the terminology, and to learn what you can do with them.
Every merge request starts by creating a branch. You can either do it locally through the command line, via a Git CLI application, or through the GitLab UI.
-
Create a branch and commit your changes
CLI Example
git checkout -b "feature_branch" // Create a local branch with checkout
You can also create a branch from Web Application, it depends on your work style. If you are creating a branch from GitLab UI and developing it from your favorite IDE; these commands will help you out:
git fetch
git checkout feature_branch
After creating a branch you should add your changes and commit your changes with commit message.
For example:
git add src/* // Add every changed file located at /src path
git commit -m "Add Login Endpoint."
-
Push your local branch to remote
git push --set-upstream origin feature_branch // Push your local branch to remote
Now you are ready to create your merge request.
-
Create a Merge Request
When you start a new merge request, regardless of the method, you are taken to the New Merge Request page to fill it with information about the merge request.
Important Notes:
*Always create merge request to source branch(the branch where you created new branch from).
For example if you created a branch from 'dev',open your merge request to 'dev'. Not 'master' or any other branches.
When creating merge request follow these steps listed below
-
Assign the merge request to a colleague for review. Generally more than one assignees are better.
-
Set a milestone to track time-sensitive changes.
-
Add labels to help contextualize and filter your merge requests over time.
-
Attach a related issue.
-
Add merge request dependencies to restrict it to be merged only when other merge requests have been merged.
-
Set the merge request as a Draft to avoid accidental merges before it is ready. While doing that you can use title prefix: WIP:.Don’t forget to add description line when it will be ready.
-
Write a description for changes (It’s also helps reviewers for understanding what are they looking at.)
While writing a merge request description be sure you are helping reviewer to what he/she is looking at. Otherwise you should okay with your colleagues closing your merge request without merging it.
Description Example:
## What does this MR Do?
* Adds Session Endpoint Paths to API Path List
* Reconfigure Public, User and Techinician Role Available API Path Lists.
* Adds Login, Logout and ValidateSession Endpoints

Closes #25!(Session Implementation)
- Once you have created the merge request, you can follow these subsections to finalize the work:
Merge Request Reviews
- Pipeline should successfully done.
- Check whether MR description is done.
- Review code carefully (Check How to review section)
- If you have any discussion point, comment each one as a different topic. (Check How to discuss section)
- If all threads/requested changes are resolved, merge it(Always FastForward).
How to review?
- Perform a Review in order to create multiple comments on a diff and publish them once you’re ready.
- Perform inline code reviews.
- Add code suggestions to change the content of merge requests directly into merge request threads, and easily apply them to the codebase directly from the UI.
- If everything looks ok, please approve the code with a comment so that new any other reviewer can see your comment and close the MR if needed.
How to discuss?
- Company public language is English. Be aware of that
- Always try to be constructive
- Explain every details of problem to transfer your idea/concerns clearly